
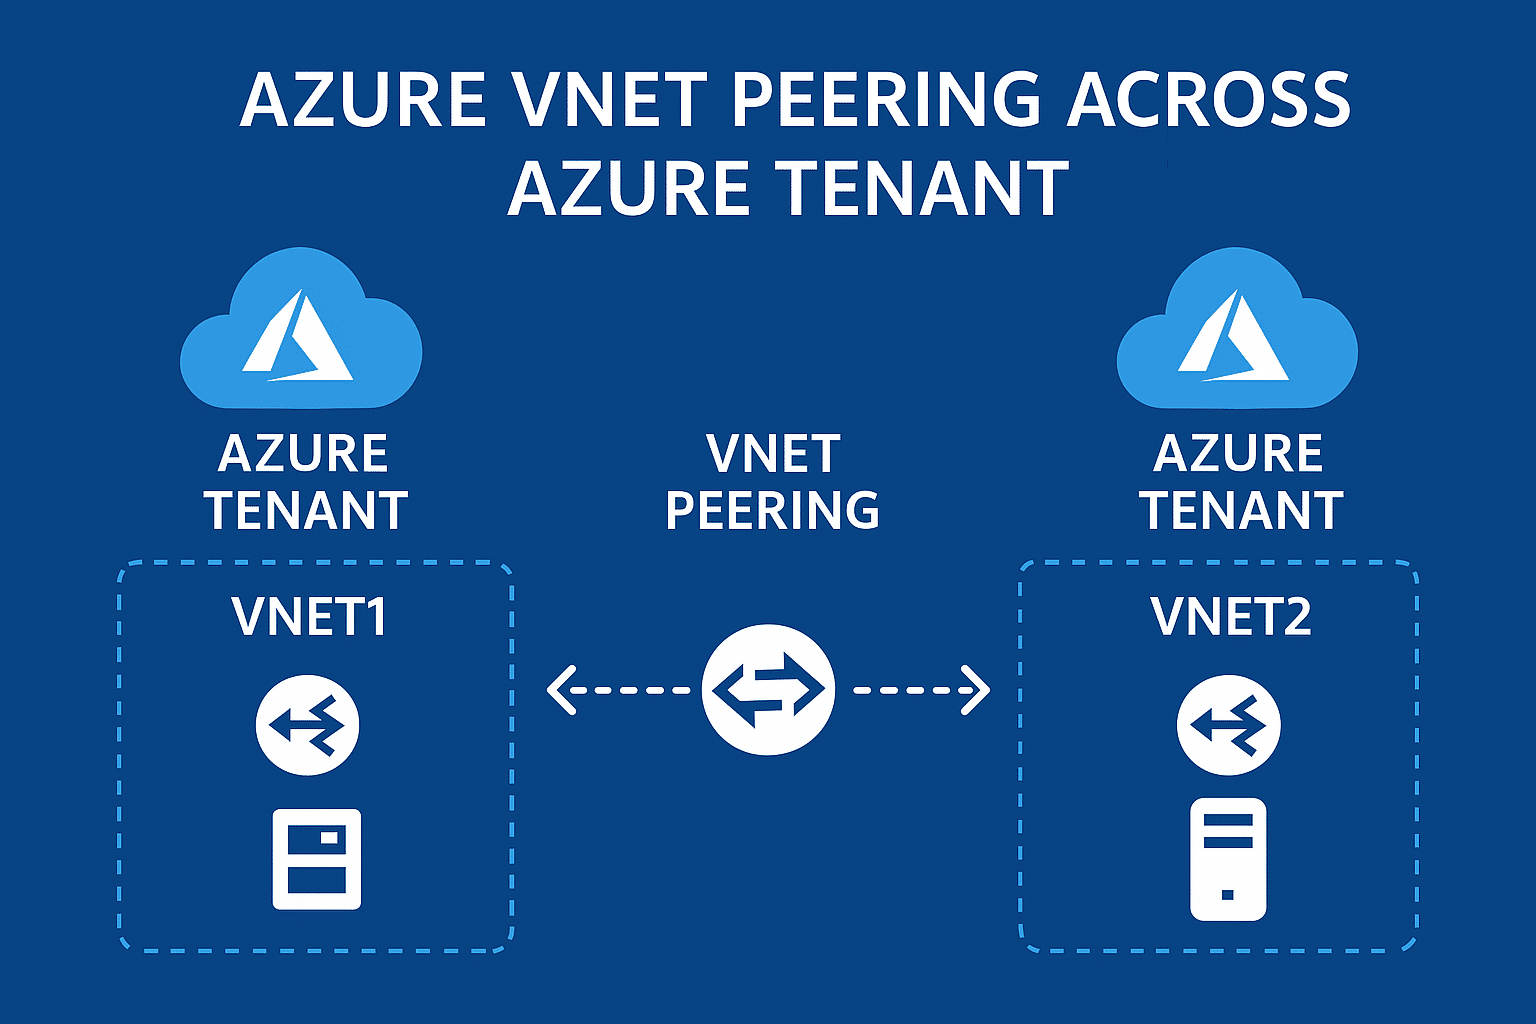
Introduction: When Your Networks Need to Make Friends Across Different Houses
Picture this: You've got two separate Azure accounts (we call them tenants), and they're like two neighboring houses that need to share resources. Maybe your company just merged with another, or perhaps you're working on a B2B integration project. Whatever the reason, you need these virtual networks to talk to each other, right? That's where Azure VNet peering cross-tenant comes into play – it's like building a secure bridge between two different Azure kingdoms.
I remember when I first stumbled upon this challenge. My team was trying to connect resources from our main company tenant to a newly acquired subsidiary's Azure environment. The documentation felt overwhelming at first, but trust me, once you understand the basics, it's actually quite straightforward. Let me walk you through everything you need to know about cross-tenant VNet peering.
What is Azure VNet Peering Cross-Tenant, and How Does it Work?
So, what exactly is this cross-tenant magic we're talking about? In simple terms, Azure VNet peering allows you to connect two virtual networks seamlessly, even when they belong to different Azure tenants. Think of it as creating a private highway between two separate cloud environments.
When you establish cross-tenant VNet peering, the traffic between these networks flows through Microsoft's backbone network – not the public internet. This means you get:
- Low latency (super-fast connections)
- High bandwidth (lots of data can flow through)
- Private connectivity (no exposure to the internet)
The beauty of this setup? Resources in both VNets can communicate as if they're sitting in the same network. It's like having two offices in different buildings but with a private tunnel connecting them – employees can walk back and forth without going outside.
The Technical Magic Behind the Scenes
Here's how it actually works under the hood:
- Each VNet maintains its own address space
- Azure creates a direct network path between them
- Traffic is routed using Microsoft's global network infrastructure
- No gateways or additional appliances needed (unless you want them)
Prerequisites: What You Need Before Starting Your Cross-Tenant Journey
Before you dive into setting up Azure cross-tenant connectivity, let's make sure you've got all your ducks in a row. Trust me, checking these prerequisites first will save you hours of troubleshooting later.
Essential Requirements Checklist
For the Networks:
- Both VNets must have non-overlapping IP address spaces (they can't use the same IP ranges)
- VNets can be in the same or different regions
- Both subscriptions must be associated with Azure Active Directory tenants
For the People (That's You!):
- You need proper permissions in both tenants
- Access to both Azure subscriptions
- Understanding of basic networking concepts (don't worry, I'll explain as we go)
What Permissions Are Required for Cross-Tenant VNet Peering?
Ah, permissions – the gatekeepers of Azure! This is where many folks get stuck, so let me break it down simply.
You'll need the Network Contributor role (at minimum) on both VNets. But here's the tricky part with cross-tenant network contributor role assignments:
In Your Home Tenant:
- Network Contributor role on your VNet
- Ability to create peering connections
In the Remote Tenant:
- Guest user access (through Azure Active Directory)
- Network Contributor permissions on the target VNet
- Proper Azure Active Directory guest access configured
Pro tip: If you're getting permission errors, double-check that your guest account has been properly added to the remote tenant. I once spent three hours debugging only to find out my invite email went to spam!
Step-by-Step Guide: Setting Up Your Cross-Tenant VNet Peering
Now comes the fun part – actually setting this up! I'll show you three different ways to configure cross-tenant VNet peering: through the Azure Portal (the visual way), Azure CLI (the command-line ninja way), and ARM templates (the infrastructure-as-code approach).
Method 1: Using the Azure Portal (The Friendly Approach)
This is perfect if you're more of a "click-and-configure" person like me when I'm having my morning coffee.
Step 1: Add Guest User to Remote Tenant
Step 2: Assign Network Contributor Role
Step 3: Create the Peering Connection
Step 4: Accept the Peering from the Other Side
Step 5: Verify the Connection
Method 2: Azure CLI (For the Command Line Warriors)
Sometimes you just want to get things done quickly without clicking through multiple screens. Here's how to configure VNet peering different tenants using Azure CLI:
bash
# First, log into your home tenant
az login --tenant YOUR_HOME_TENANT_ID

# Create the peering connection
az network vnet peering create \
  --name MyPeeringConnection \
  --resource-group MyResourceGroup \
  --vnet-name MyVNet \
  --remote-vnet /subscriptions/REMOTE_SUBSCRIPTION_ID/resourceGroups/REMOTE_RG/providers/Microsoft.Network/virtualNetworks/REMOTE_VNET \
  --allow-vnet-access
Method 3: ARM Templates (The Infrastructure-as-Code Way)
For those who love automation and repeatability, Virtual network peering ARM templates cross tenant is your best friend:
json
{
  "type": "Microsoft.Network/virtualNetworks/virtualNetworkPeerings",
  "apiVersion": "2020-11-01",
  "name": "[concat(parameters('vnetName'), '/peering-to-remote')]",
  "properties": {
    "remoteVirtualNetwork": {
      "id": "[parameters('remoteVnetId')]"
    },
    "allowVirtualNetworkAccess": true,
    "allowForwardedTraffic": false,
    "allowGatewayTransit": false,
    "useRemoteGateways": false
  }
}
Common Use Cases: When Cross-Tenant Peering Saves the Day
Let me share some real-world scenarios where Azure VNet peering for B2B integration becomes invaluable:
Mergers and Acquisitions
When your company acquires another, you don't want to migrate everything immediately. Cross-tenant peering lets both environments work together while you plan the integration properly.
Shared Services Architecture
Imagine you have a centralized logging or monitoring service in one tenant that multiple business units (each with their own tenant) need to access. Perfect use case!
Partner Integrations
Working with a partner company? You can securely share specific resources without giving them access to your entire Azure environment.
Development and Production Separation
Some organizations keep dev and prod in separate tenants for security. Peering lets developers access production data safely when needed.
Network Limitations and Constraints: The Fine Print
Now, let's talk about the not-so-fun but important stuff – the limitations. Every technology has its boundaries, and knowing them upfront helps you plan better.
Key Limitations to Remember
Address Space Overlaps:
- VNets cannot have overlapping IP ranges
- Once peered, you can't change the address space
Transitive Peering:
- Is transitive peering supported across tenants? Unfortunately, no
- If VNet A peers with VNet B, and B peers with C, A cannot talk to C directly
- You'll need to set up hub-and-spoke or mesh topologies for multi-tier architectures
Regional Constraints:
- Global peering (across regions) might have higher latency
- Some Azure services might not work across regions
Performance Considerations
AspectSame RegionCross RegionLatency< 1ms10-100msBandwidthUp to 50 GbpsUp to 10 GbpsCostLowerHigherAvailability 99.95%99.95%
Security Best Practices: Keeping Your Cross-Tenant Connection Safe
Security is paramount when connecting different tenants. Here's how to ensure your network security with cross-tenant peering is rock-solid:
Authentication and Authorization
Service Principal Authentication Cross Tenant:
- Use service principals instead of user accounts for automation
- Implement least-privilege access principles
- Regularly rotate credentials
Network Security Groups (NSGs):
- Apply NSGs at both subnet and NIC levels
- Create specific rules for cross-tenant traffic
- Log and monitor all traffic flows
Azure Cross-Tenant Networking Policies
Implement these policies for better governance:
- Naming Conventions: Use clear, consistent names for peering connections
- Documentation: Keep detailed records of all peering relationships
- Regular Audits: Review permissions and connections quarterly
- Change Management: Have a process for modifying peering configurations
DNS and Name Resolution: Making Services Discoverable
One common question I get is: "Can you enable name resolution between VNets in different tenants?" The answer is yes, but it requires some configuration.
Setting Up DNS for Cross-Tenant Peering
Option 1: Azure Private DNS Zones
- Create a private DNS zone in one tenant
- Link it to VNets in both tenants
- Requires additional configuration but provides centralized management
Option 2: Custom DNS Servers
- Deploy DNS servers in each VNet
- Configure forwarding between them
- More complex but offers complete control
Option 3: Azure DNS Private Resolver
- Latest solution from Microsoft
- Simplifies DNS resolution across tenants
- Recommended for new deployments
Quick tip: Always test DNS resolution after setting up peering. Use nslookup or dig commands to verify that resources can find each other by name, not just IP.
Troubleshooting Guide: When Things Don't Go as Planned
Let's be honest – sometimes things don't work on the first try. Here's how to troubleshoot Azure cross-tenant VNet peering issues:
Common Issues and Solutions
Problem 1: "Authorization Failed" Error
- Solution: Check guest user permissions in remote tenant
- Verify Network Contributor role assignment
- Ensure the subscription is registered with Microsoft.Network provider
Problem 2: Peering Status Stuck in "Initiating"
- Solution: Check if peering needs to be accepted on the remote side
- Verify network address spaces don't overlap
- Look for policy restrictions in either tenant
Problem 3: Resources Can't Communicate After Peering
- Solution: Check NSG rules on both sides
- Verify routing tables if using custom routes
- Test with
pingorTest-NetConnectioncommands
Diagnostic Tools
bash
# Check peering status
az network vnet peering show \
  --name MyPeering \
  --resource-group MyRG \
  --vnet-name MyVNet

# Test connectivity
Test-NetConnection -ComputerName 10.0.0.4 -Port 3389

# Check effective routes
az network nic show-effective-route-table \
  --name MyNIC \
  --resource-group MyRG
Monitoring and Management: Keeping Your Peering Healthy
Once your cross-tenant peering is up and running, you need to monitor it. Here are cross-tenant VNet monitoring best practices:
Key Metrics to Track
- Peering Status: Should always be "Connected"
- Data Transfer: Monitor ingress and egress traffic
- Packet Drops: Should be minimal or zero
- Latency: Track round-trip times between resources
Using Azure Monitor
Set up alerts for:
- Peering disconnection
- Unusual traffic patterns
- High latency spikes
- Failed connection attempts
Cost Management
Speaking of monitoring, let's talk money. What billing implications should you consider?
Data Transfer Charges:
- Ingress (incoming) traffic: Free
- Egress (outgoing) traffic: Charged based on volume
- Cross-region transfers cost more
Cost Optimization Tips:
- Place frequently communicating resources in the same region
- Use Azure Cost Management to track peering-related expenses
- Consider Reserved Capacity for predictable workloads
Traffic TypeSame RegionCross Region (same geography)Cross Region (different geography)IngressFreeFreeFreeEgress$0.01/GB$0.02/GB$0.05/GB
Note: Prices are approximate and vary by region
Advanced Scenarios: Taking It to the Next Level
Hub-and-Spoke Topology
Since transitive peering isn't supported, many organizations use hub-and-spoke for hybrid cloud VNet peering scenarios:
- Create a central hub VNet in one tenant
- Peer spoke VNets from different tenants to the hub
- Use Azure Firewall or NVA in the hub for traffic inspection
- Enable gateway transit for VPN/ExpressRoute connectivity
Multi-Tier Architecture Alternatives
Without transitive peering, here are your options:
Option 1: Full Mesh
- Peer every VNet with every other VNet
- Simple but becomes complex with many VNets
- Higher management overhead
Option 2: Azure Virtual WAN
- Managed service for complex topologies
- Supports cross-tenant scenarios
- Higher cost but easier management
Option 3: Site-to-Site VPN
- Use VPN gateways for connectivity
- More complex but offers additional features
- Good for scenarios requiring encryption
✅Step-by-Step: VNet Peering Across Azure Tenants
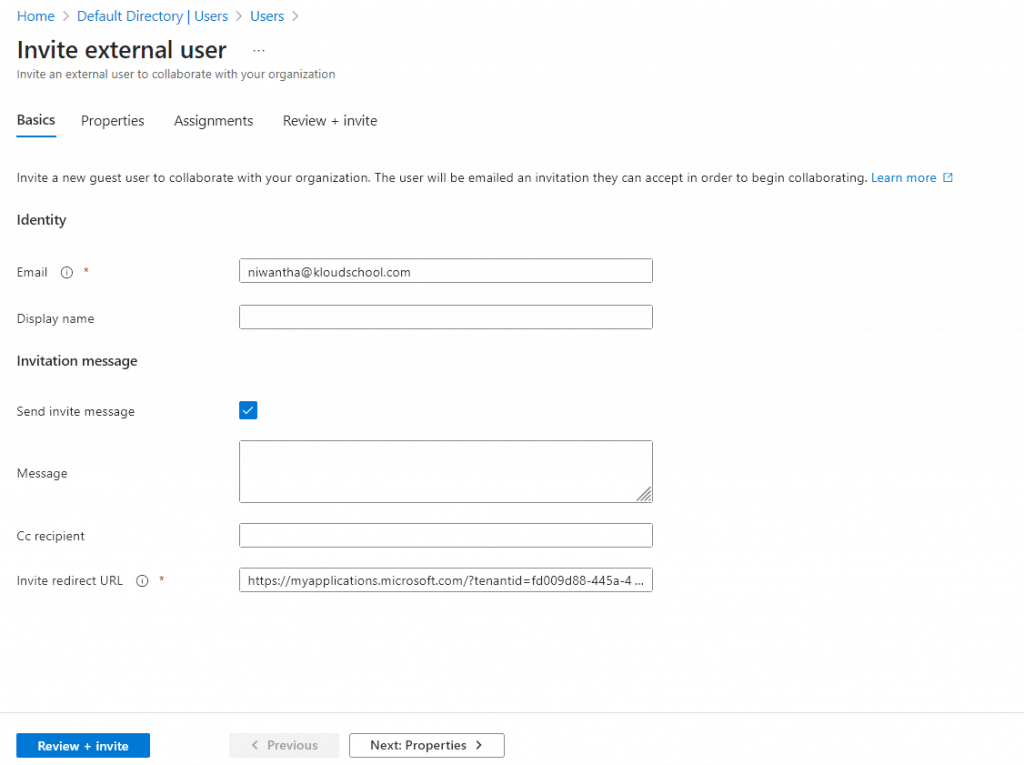
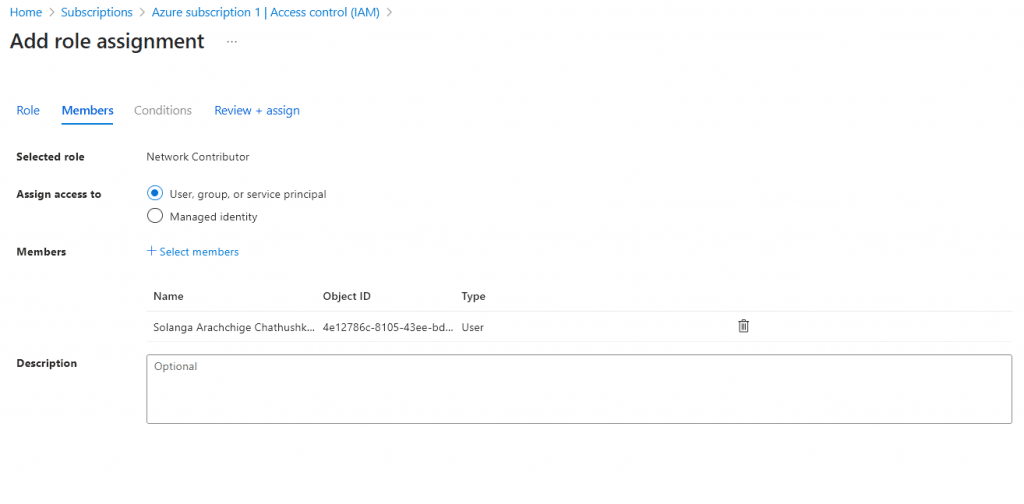
For this demo, I have two Azure tenants. I have invited my user niwantha@kloudscool.com to the new tenant as an external user. After that, I need to assign the 'Network Contributor' IAM role (subscription level) to that user.
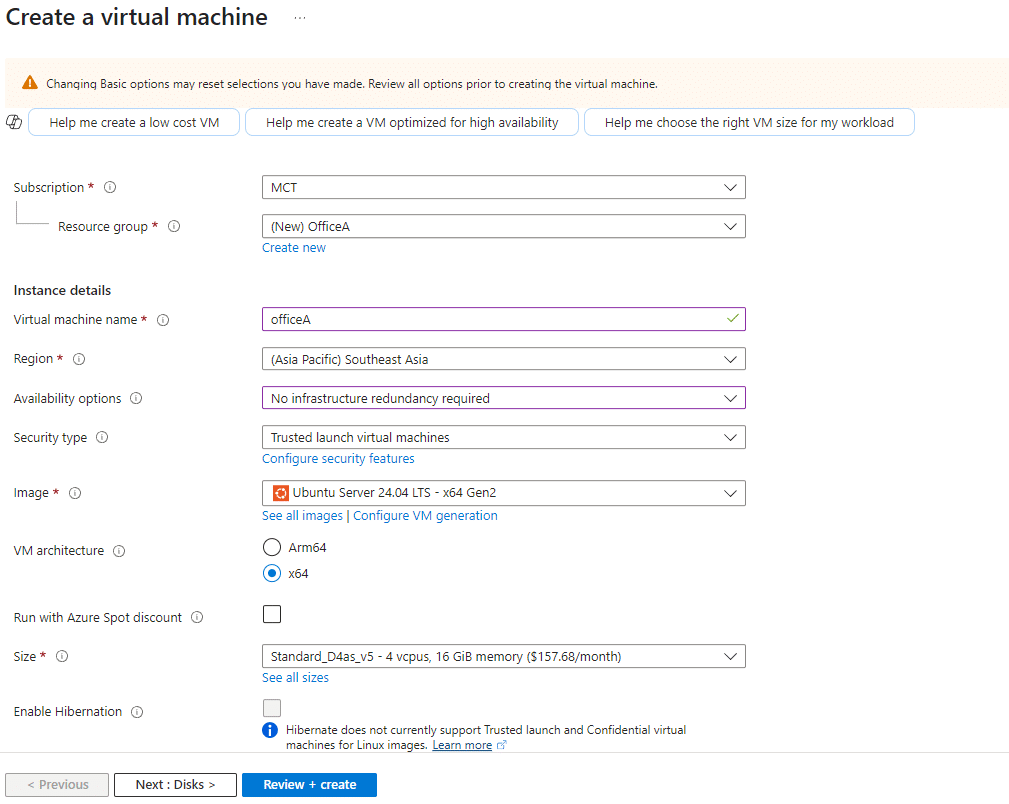
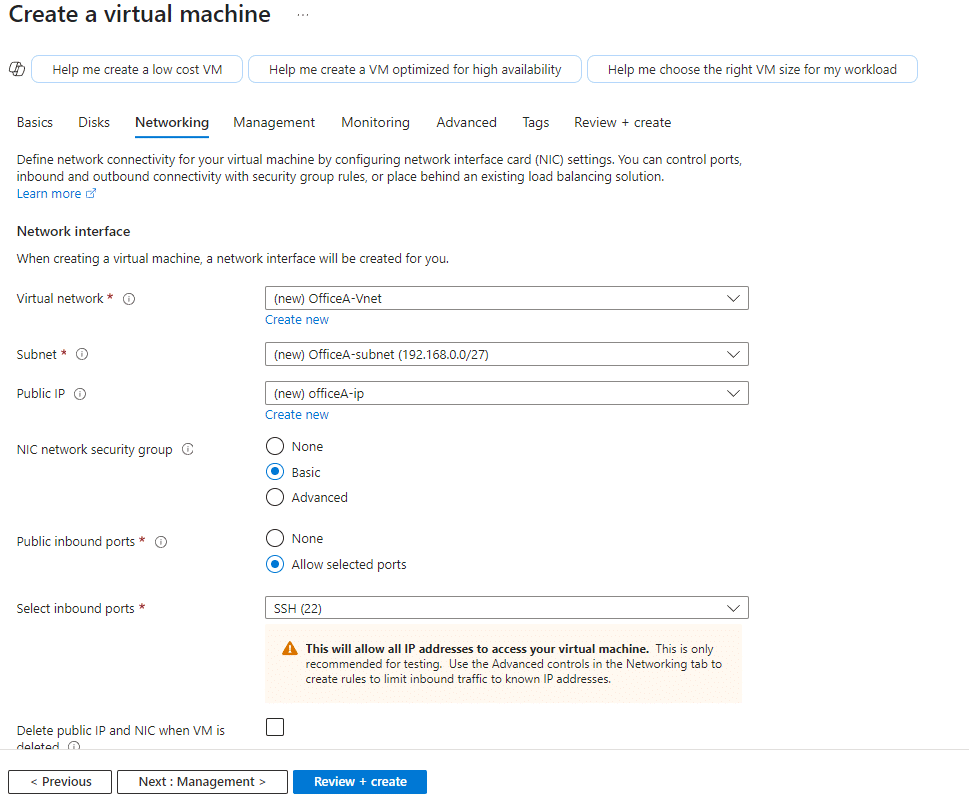
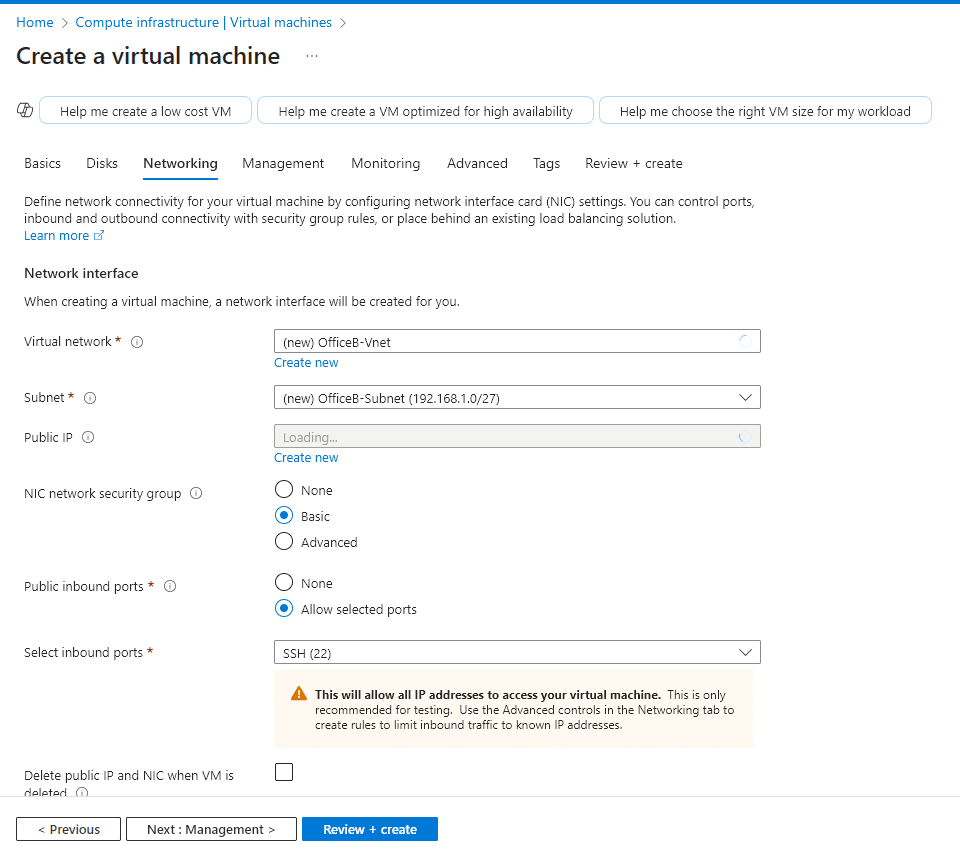
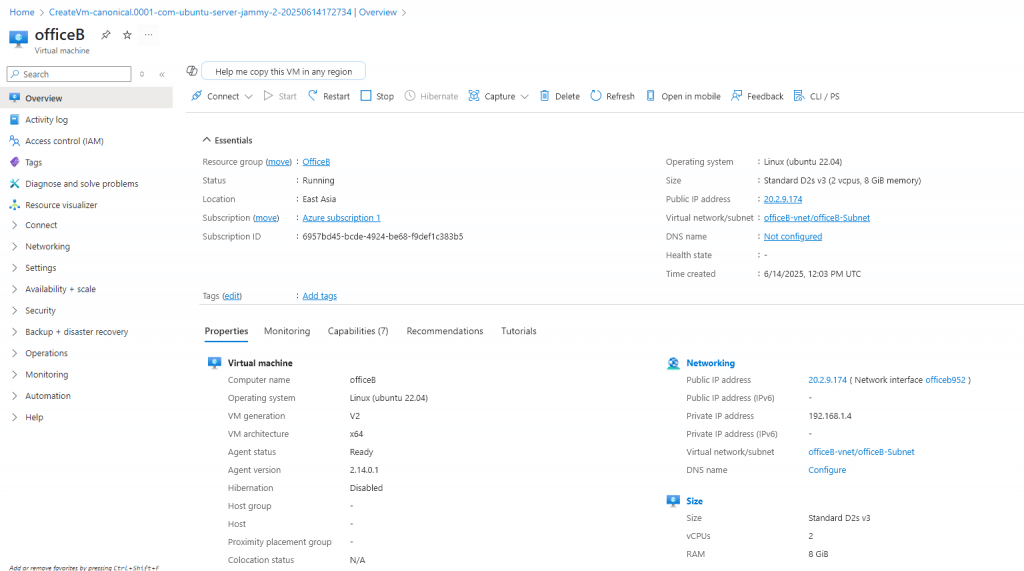
1. Create two Virtual machine on Different tenant
During the virtual machine creation steps, it is important to be aware of the VNet IP address ranges. If the IP ranges of the VNets conflict, the peering will not work. For this demo, on the kloudschool.com tenant side, I created a VM named OfficeA with the IP address range 192.168.0.0/24. In the other tenant, I created a VM named OfficeB with the IP address range 192.168.1.0/24.
✅Kloudschool tenant Side
✅Johnpark tenant Side

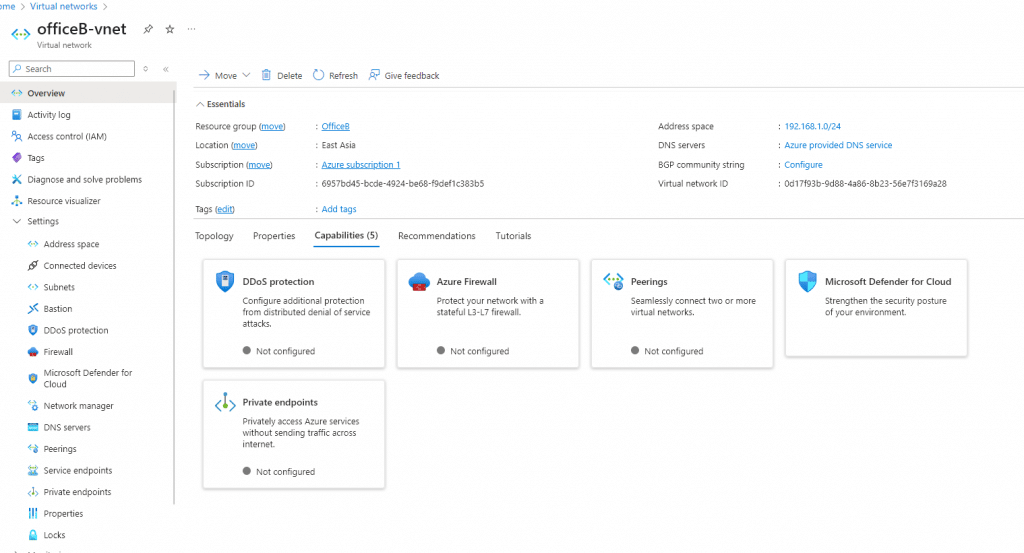
✅Both Side VM's and Vnet's Configured
✅Virtual Machines

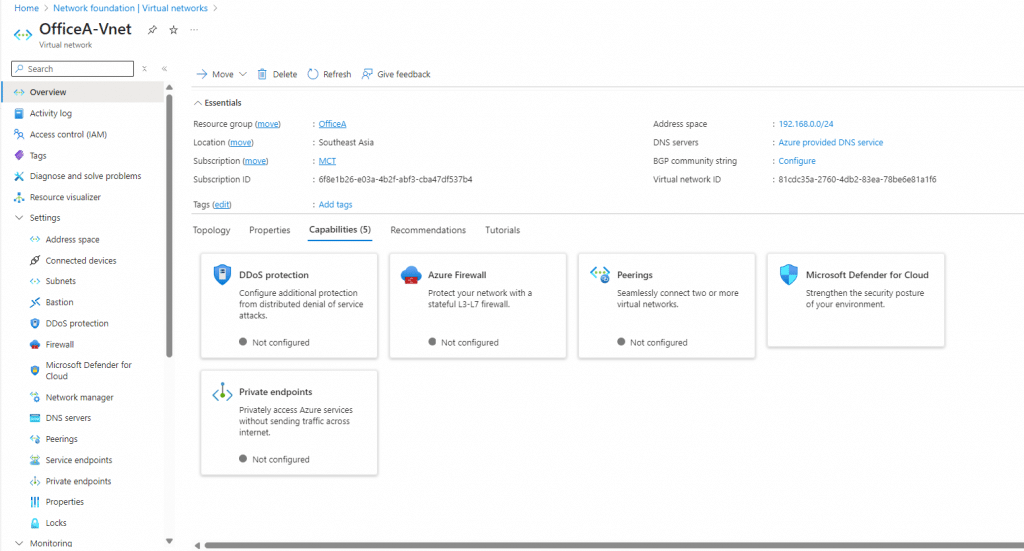
✅Virtual Networks and Still not Peering
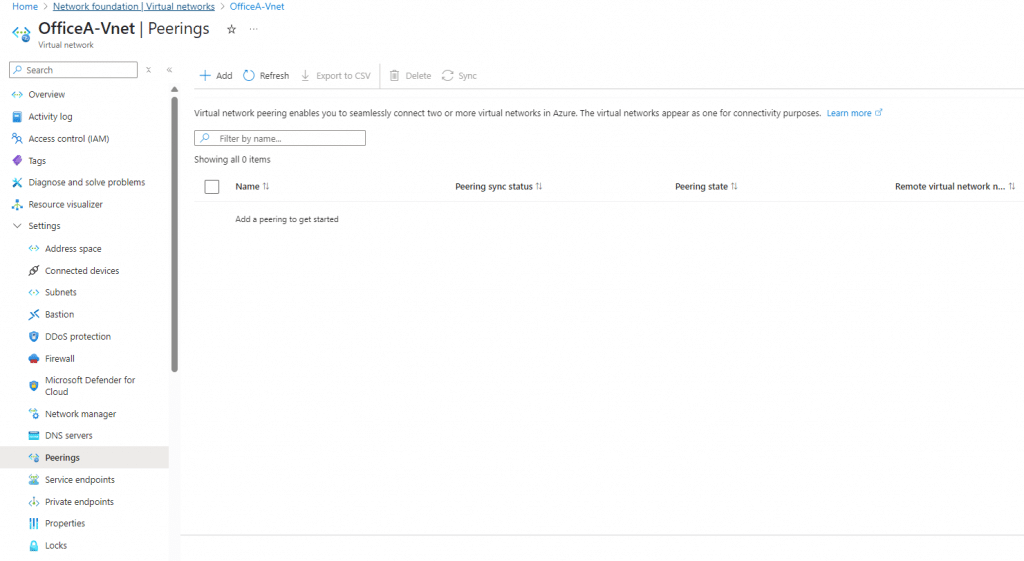
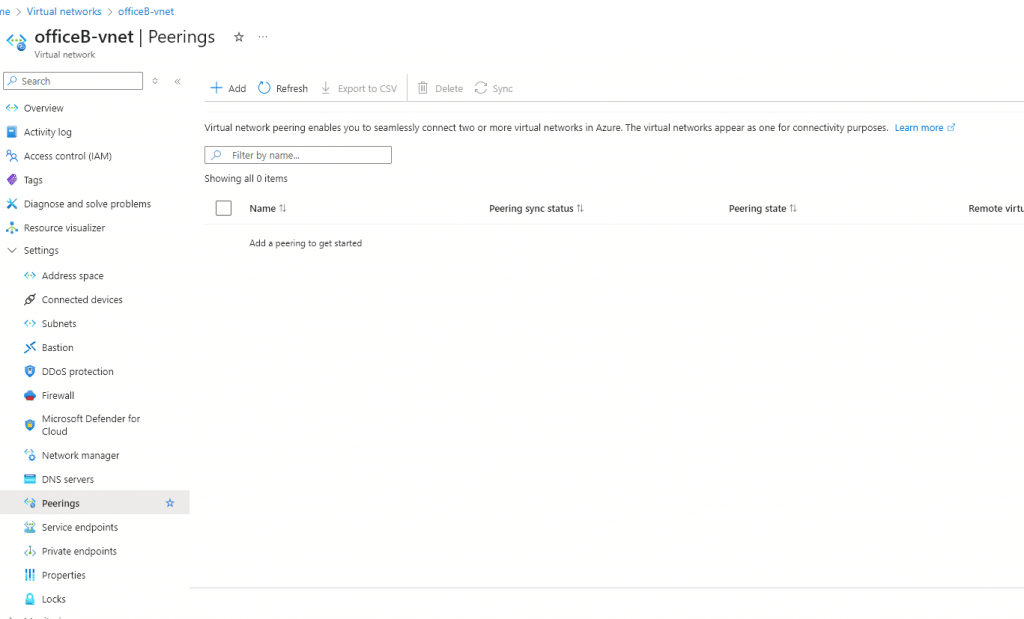
✅Checking the connectivity between Office A and Office B Servers using Private IP address.
OfficeA VM Private IP : 192.168.0.4
OfficeB VM Private IP : 192.168.1.4
✅Log in to the OfficeA VM and check the connectivity.
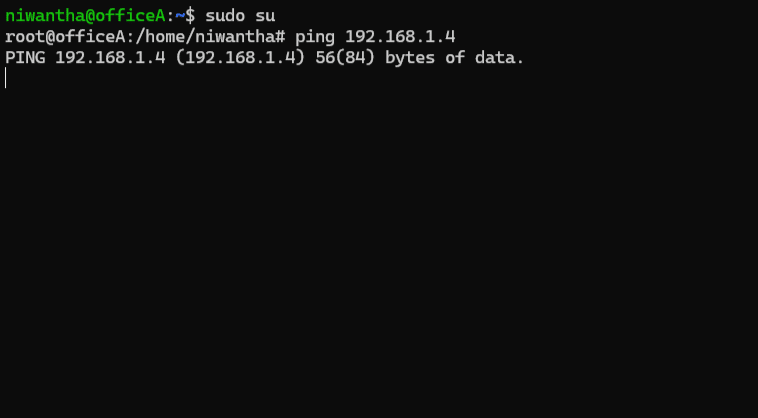
Seems like no connectivity.
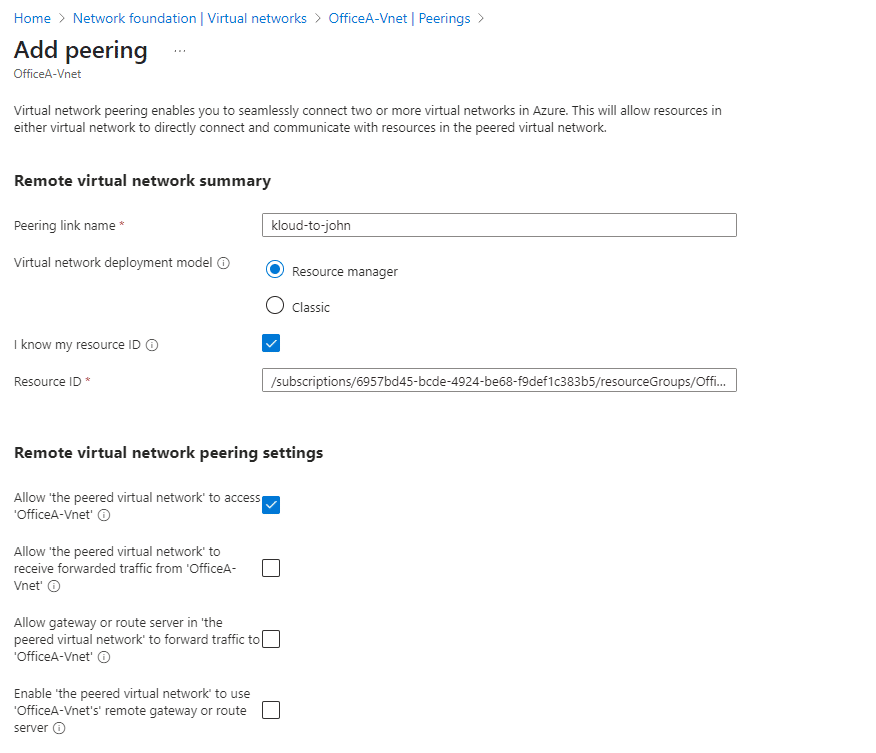
1. Create Vnet peering From OfficeA Side
Note: Before implementing this peering, the same user must exist in both tenants. This user must have at least the 'Network Contributor' role assigned at the subscription level in both tenants.
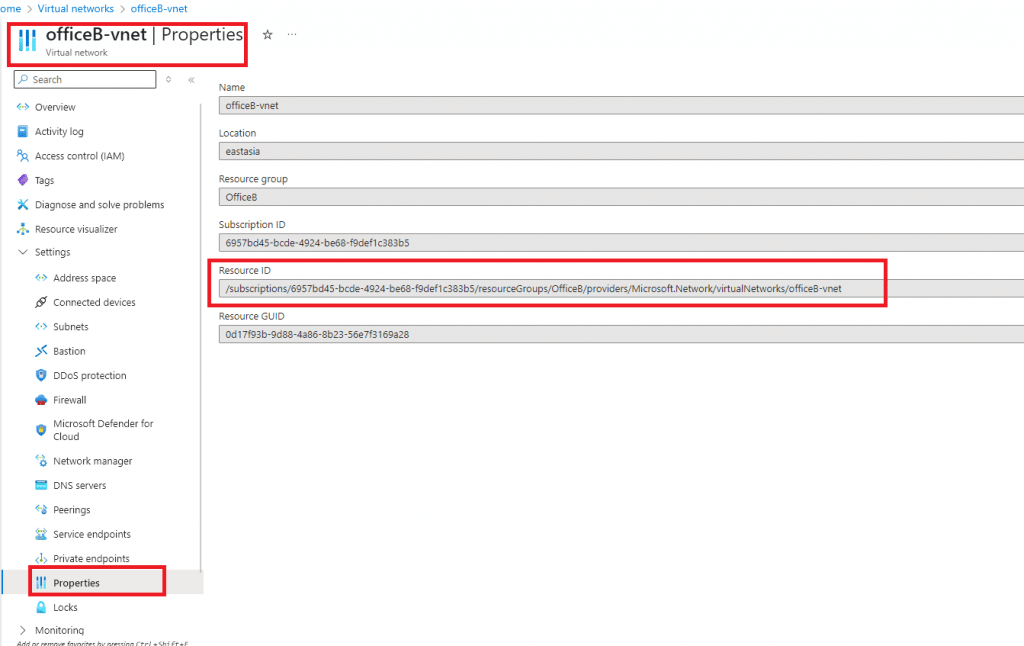
✅Before the this process we need to get resource ID
✅Vnet --> properties --> Resource ID
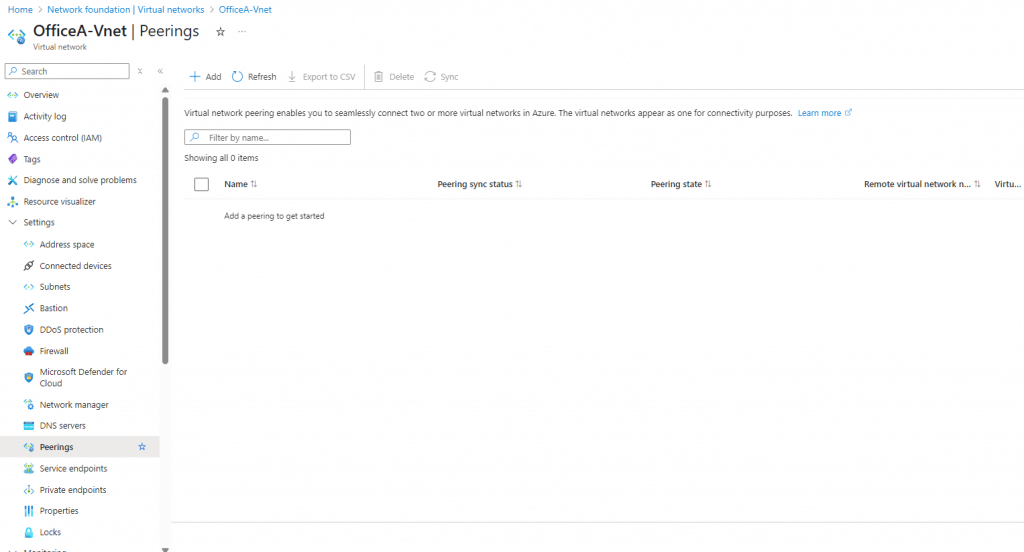
✅Vnet ---> Peering
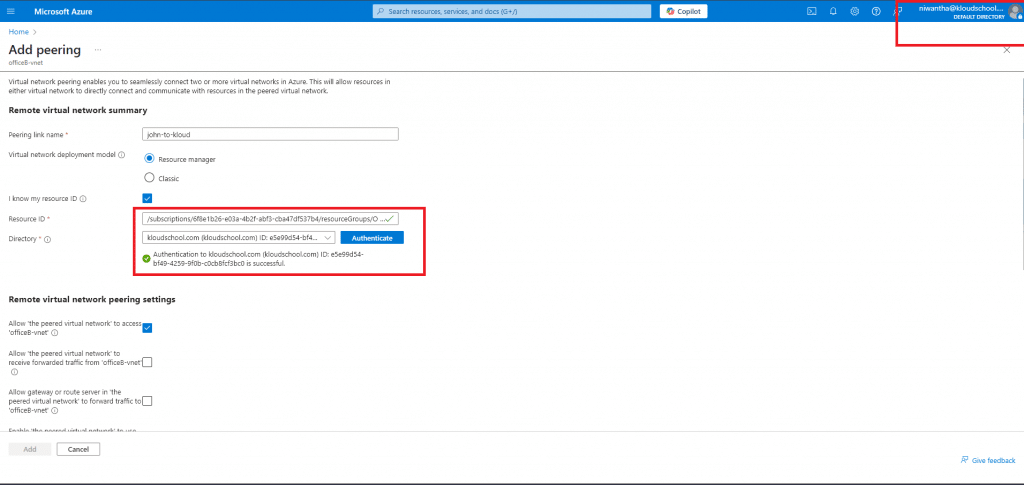
✅Click add and give name (ex: kloud-to-john) and select I know my resource ID and Give OfficeB Vnet resource ID
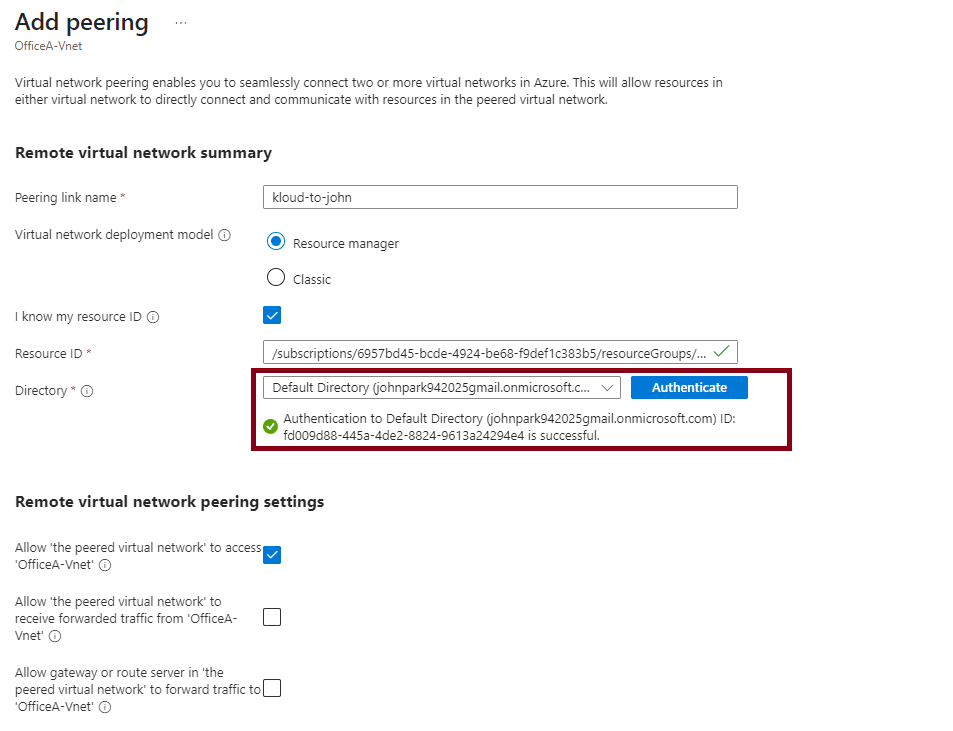
✅Authenticate with John tenant
✅Give local peering link name (Ex: john-to-kloud)
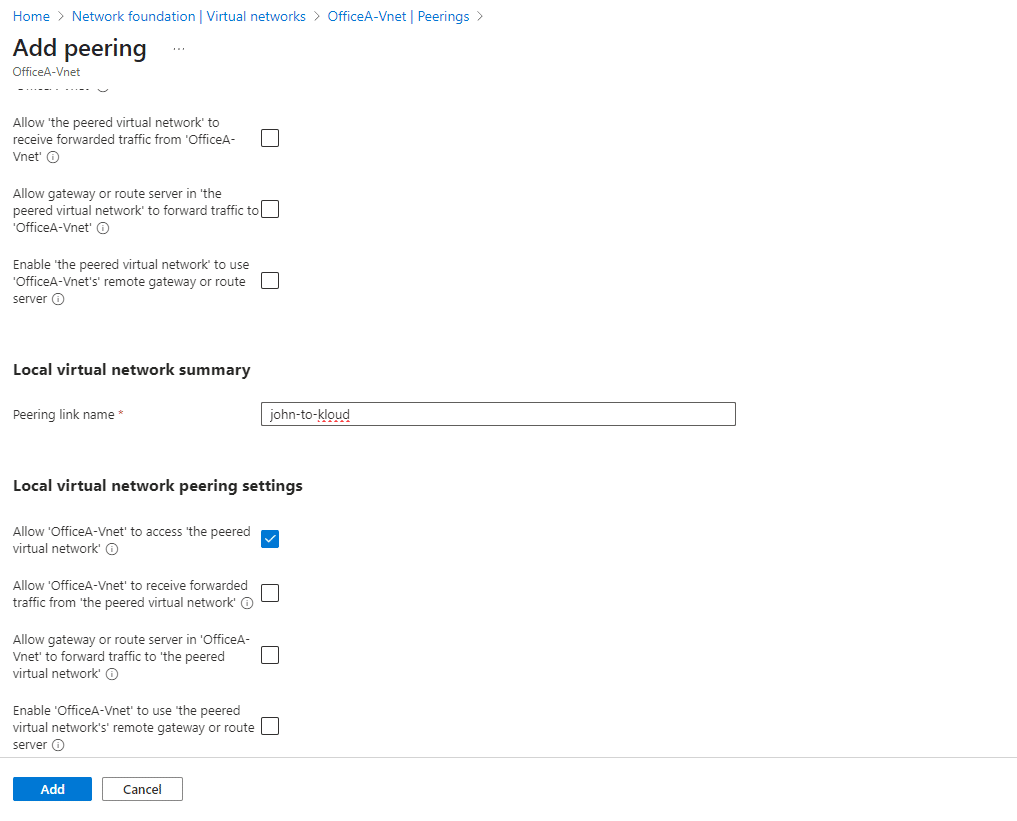
Click Add -- Now peering initiated✅
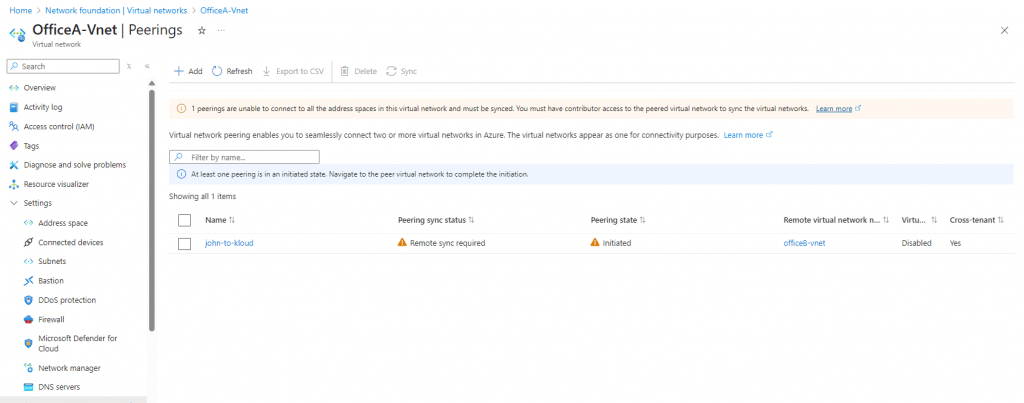
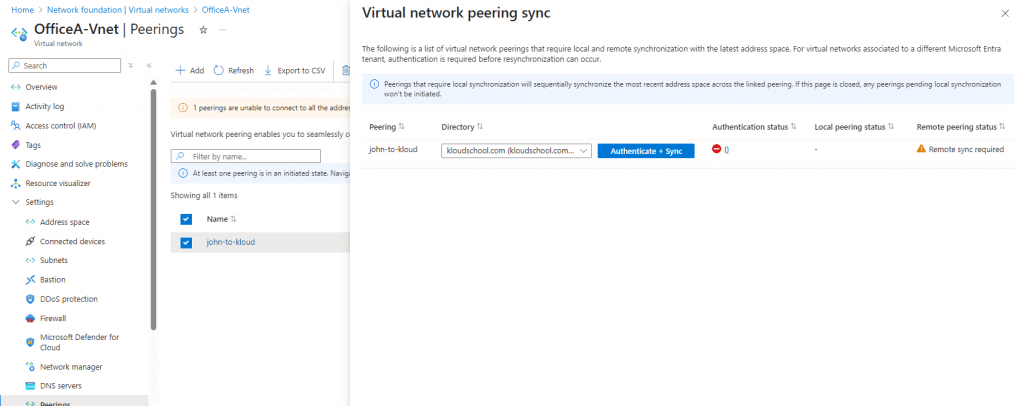
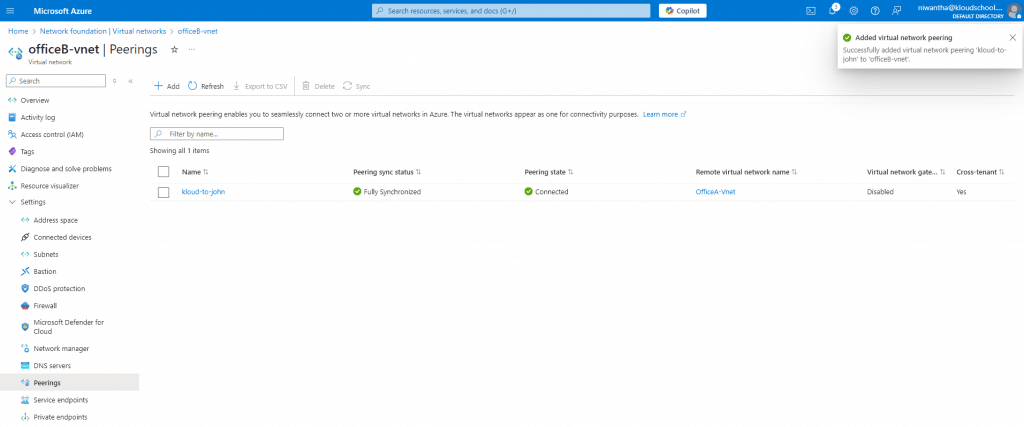
✅Click Peering --> Sync --> Select current tenant
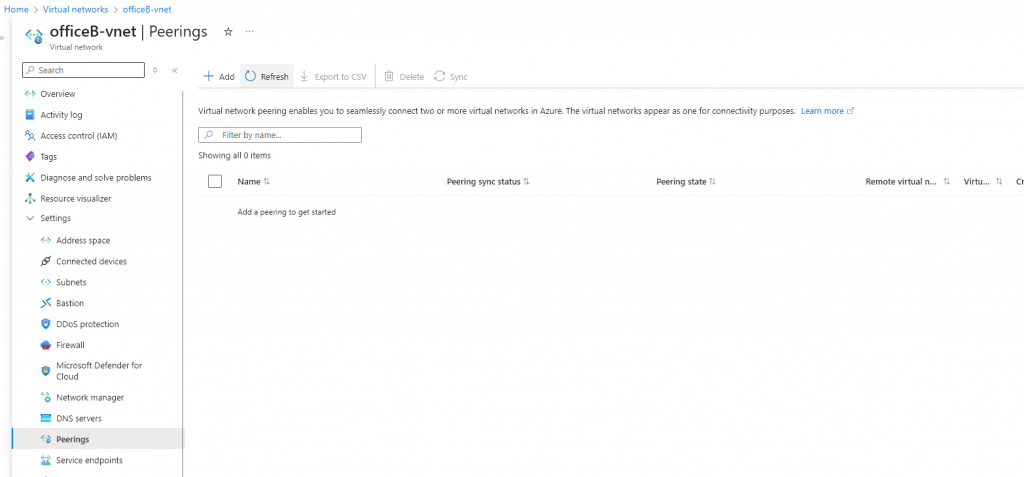
✅Do Same process OfficeB side.
✅Note: Before initiating this peering, you must log in to the tenant using the same user account.
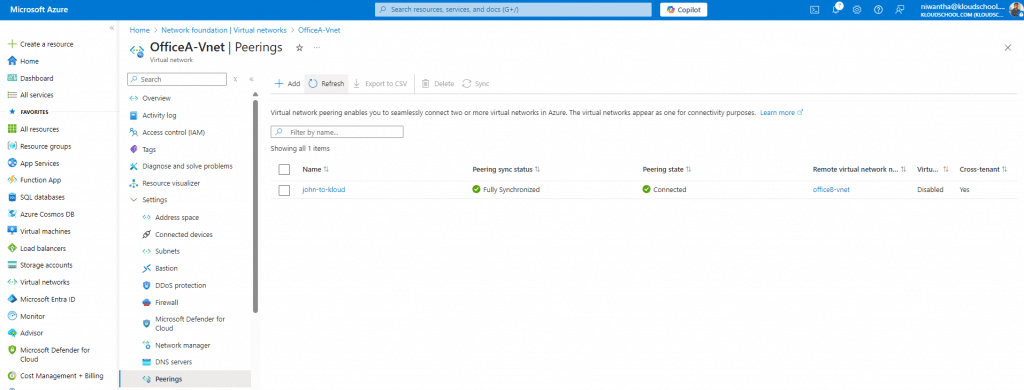
✅Copy the OfficeA virtual network resource ID and create the peering from the OfficeB side to OfficeA.
✅Note : need to authenticate OfficeA tenant.
✅OfficeA Side
✅Test Connectivity
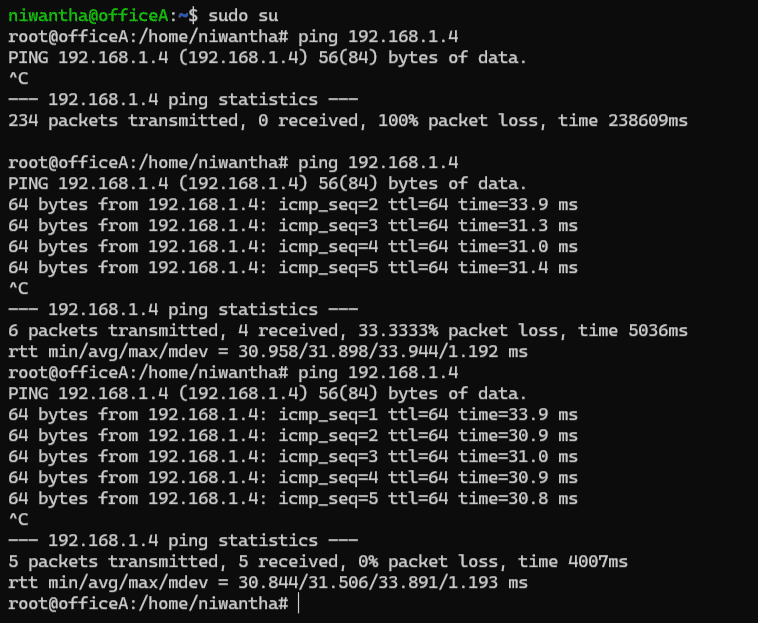
Seem like now connectivity is success and Both Peering Synchronized. ✅
✅Best Practices to Follow
Here are some expert tips:
- Avoid IP range overlap from the start.
- Document who accepted the peering and for what purpose.
- Add tags and use consistent naming conventions (e.g.,
peer-to-prod-vnet). - Test access from both sides using tools like
ping,telnet, or custom scripts. - Review peering connections regularly and remove unused ones.
Conclusion: You're Now a Cross-Tenant Peering Expert!
Congratulations! You've just learned everything you need to know about Azure VNet peering cross-tenant setup. From understanding the basics to troubleshooting complex issues, you're now equipped to connect virtual networks across different Azure tenants like a pro.
Remember, the key to successful cross-tenant peering is:
- Planning: Check those prerequisites carefully
- Permissions: Get your guest access and roles sorted early
- Patience: Sometimes it takes a few minutes for changes to propagate
- Practice: Try it in a test environment first
Whether you're dealing with mergers, building B2B integrations, or just trying to share resources between different parts of your organization, cross-tenant VNet peering is a powerful tool in your Azure toolkit.
Ready to get started? Pick your preferred method (Portal, CLI, or ARM templates) and give it a try. And hey, if you run into issues, come back to this guide – I've probably covered the solution somewhere in here!
Have you successfully set up cross-tenant peering? What challenges did you face? Drop me a line – I'd love to hear about your experiences and maybe learn a trick or two from you as well!
Remember: Azure is constantly evolving, so always check the latest documentation for any updates to the features discussed here. Happy peering!


No comments yet. Be the first to share your thoughts!