

Imagine this scenario: Your company, let's call it the "Main Office," has a well-established Azure environment. You have web servers running Nginx behind an Internal Load Balancer (Internal LB), all accurately and nicely configured within a virtual network (VNet) with the IP range 10.0.0.0/16.
Then, your company acquires a smaller business, the "New Office." You need to give the New Office staff access to your Main Office applications. You provisioned an Azure environment for the that company within your own subscription. However, the only available CIDR block you could assign was 10.0.0.0/16. But here is the nightmare: your existing and newly create both networks setup also uses the exact same IP range: 10.0.0.0/16.
The Problem: You cannot use Virtual Network Peering. Azure will immediately reject the peering request because the IP address spaces overlap. You also cannot easily change the IP range of a live production environment.
So, how do you connect a VM in the New Office VNet to the application in the Main Office VNet when they both think they own the same IP addresses?

In this article , I will walk through the professional, "senior engineer" way to solve this common real-world challenge using a powerful Azure feature: Azure Private Link.
The Brief Answer: The Azure Magic Trick
When IP ranges overlap, standard routing fails. The router in the New Office VNet gets confused because it thinks the Main Office IP addresses are part of its own local network.
The solution is to stop trying to route traffic normally. Instead, we use Azure Private Link.
Here is the high-level concept:
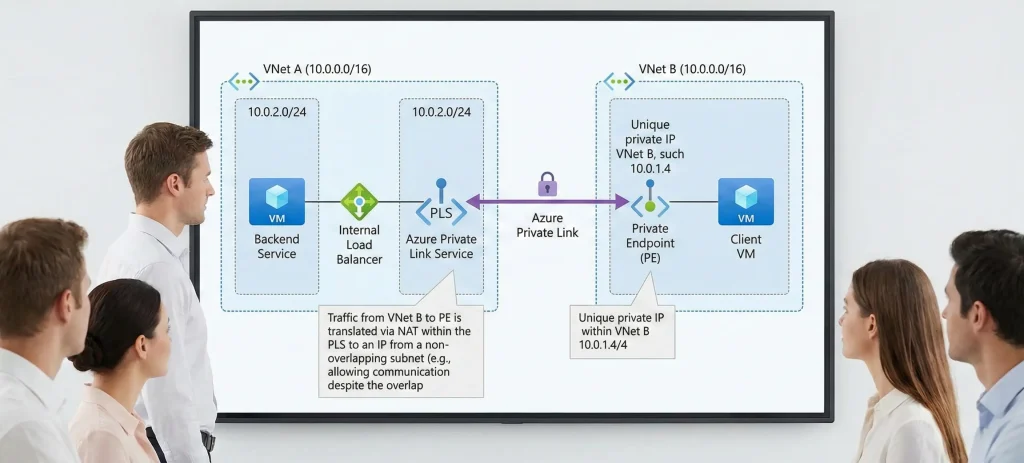
- In the Main Office (Provider) side, we attach a "Private Link Service" to our Internal Load Balancer. This acts as a secure doorway.
- In the New Office (Consumer) side, we create a "Private Endpoint." This is a special network interface that gets a unique IP address inside the New Office VNet.
- Azure creates a private, hidden tunnel behind the scenes connecting that Private Endpoint directly to the Main Office's service.
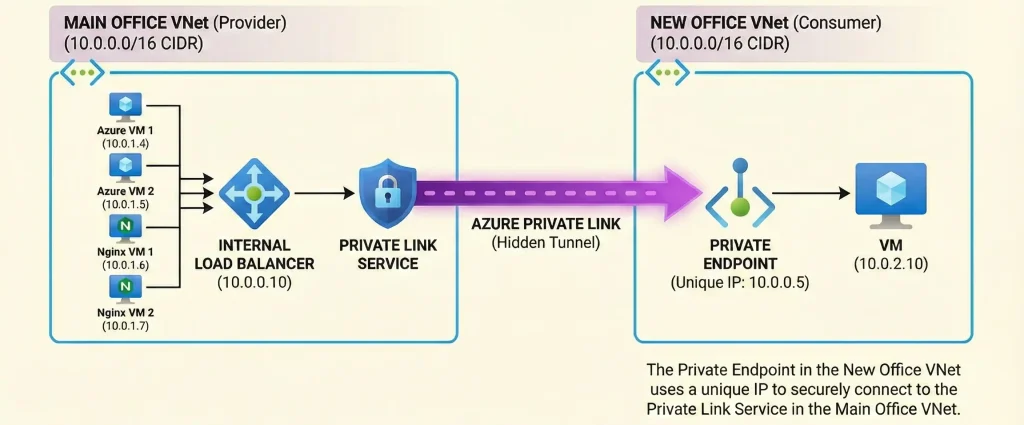
When a user in the New Office wants to access the app, they don't connect to the conflicting Main Office IP. They connect to their own local Private Endpoint IP. Azure handles the network translation magic in the middle.
The Scenario Setup
Before we dive into the steps, let's clearly define our lab environment. We are simulating a real-world merger scenario.
1. Main Office VNet (The Service Provider)
- Region: Southeast Asia
- VNet CIDR:
10.0.0.0/16 - Subnet for App:
backend-subnet(10.0.1.0/24) - Resources:
- Two Nginx VMs running in different Availability Zones for high availability.
- A Standard Internal Load Balancer (ILB) sitting in front of these VMs. Let's say its IP is
10.0.1.100.
2. New Office VNet (The Service Consumer)
- Region: East Asia (Different regions make it more realistic, but it works in the same region too).
- VNet CIDR:
10.0.0.0/16(Notice: It is the exact same range!) - Subnet for Users:
client-subnet(10.0.1.0/24) - Resources: One "Client VM" that needs to access the Nginx app.

Step-by-Step Guide: Bridging the Gap
Let's build this solution. We will start with the Main Office side.
Step 1: Prepare the Main Office VNet
We assume you already have your Nginx VMs and Internal Load Balancer set up. If not, you need to deploy those first.
The crucial prerequisite for Private Link is a dedicated subnet for NAT (Network Address Translation). The Private Link Service needs its own space to perform IP translation so the overlapping IPs don't confuse your backend Nginx servers.
- Go to your Main Office VNet in the Azure Portal.
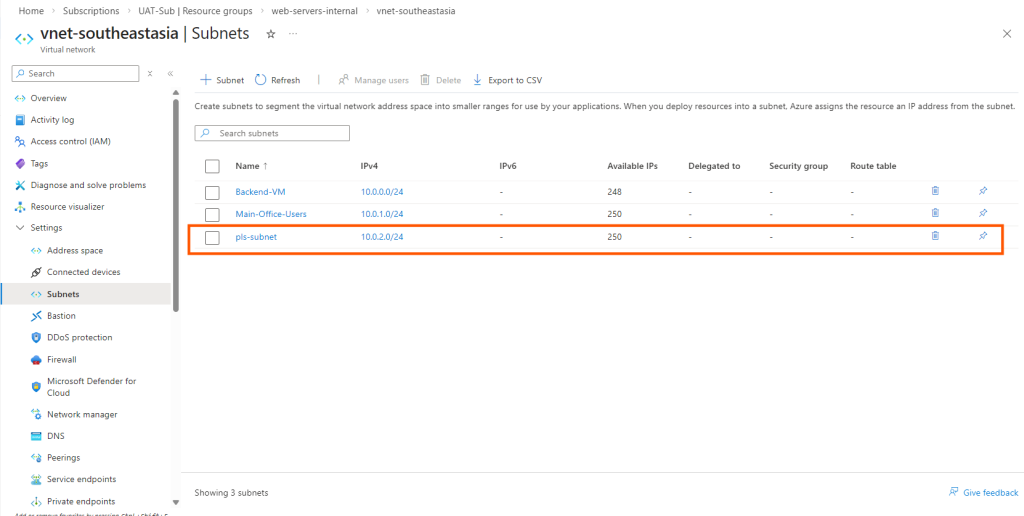
- Navigate to Subnets.
- Create a new subnet. Let's call it
pls-subnet. Give it a small range that doesn't conflict with your existing workloads, for example,10.0.2.0/24. - Important: In the subnet properties, ensure that "Private endpoint network policies" and "Private link service network policies" are disabled (or set to "None"). This is required for the NAT subnet.
Step 2: Create the Private Link Service (Provider Side)
Now, let's expose our Internal Load Balancer securely.
- In the Azure portal search bar, type "Private Link Services" and click Create.
- Basics Tab:
- Select the Resource Group and Region of your Main Office VNet.
- Give it a name, like
pls-my-nginx-app.
- Outbound Settings Tab:
- Load Balancer: Select your existing Standard Internal Load Balancer.
- Frontend IP: Select the frontend IP configuration of your ILB (
10.0.1.100). - Source NAT Subnet: Select the dedicated
pls-nat-subnet(10.0.5.0/24) you created in Step 1.
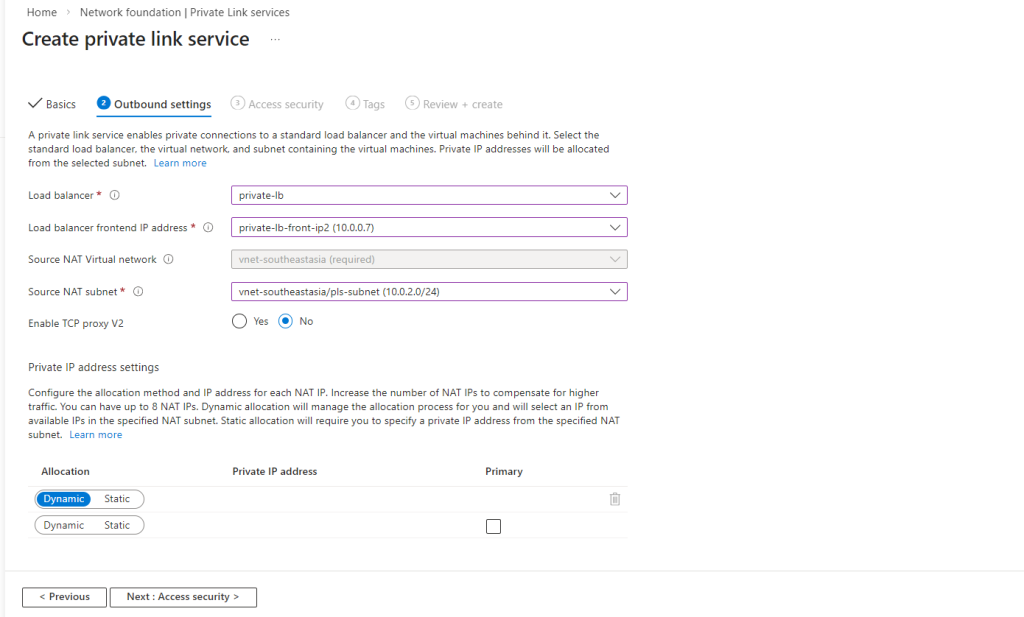
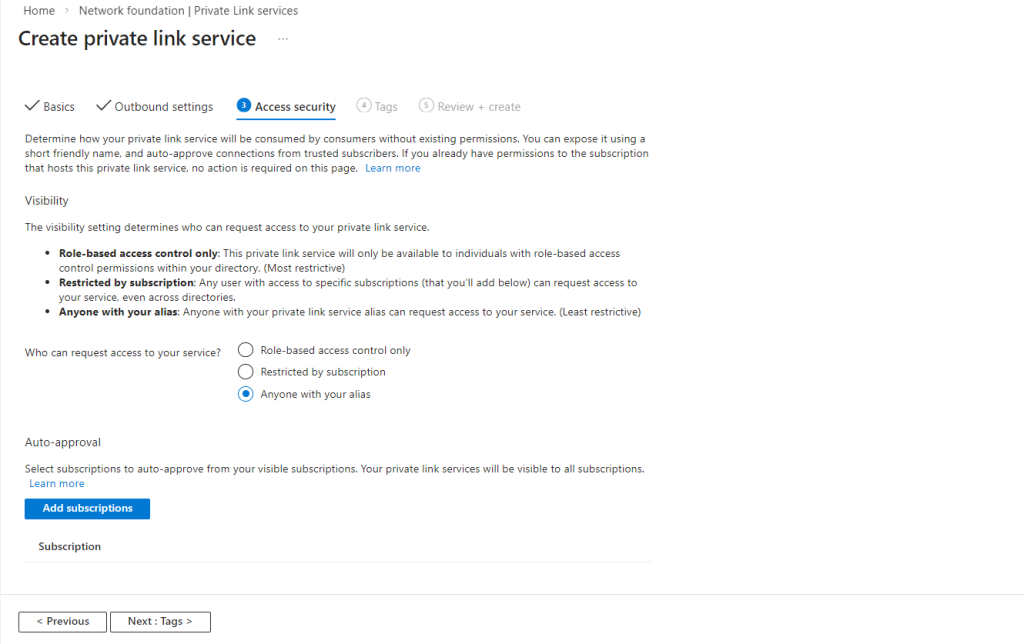
- Access Security Tab:
- To keep this lab simple, select "Anyone with your alias". This allows anyone who knows the service's unique ID to request a connection (you still have to approve it). In a production environment, you would restrict this by subscription ID.
- To keep this lab simple, select "Anyone with your alias". This allows anyone who knows the service's unique ID to request a connection (you still have to approve it). In a production environment, you would restrict this by subscription ID.
- Review and Create the service.
Once deployment is finished, go to the resource's Overview page. You will see a long string called the Alias (e.g., pls-main-office-nginx.2345-3456.eastus.azure.privatelinkservice). Copy this Alias; you will need it for the next step.
Step 3: Set Up the New Office VNet (Consumer Side)
Now, switch gears. Imagine you are the administrator for the New Office. You have a VNet that conflicts with the Main Office (10.0.0.0/16), and you have a Client VM running in the client-subnet.
You don't need to do any special VNet configuration here yet.
Step 4: Create the Private Endpoint
This is where we connect the two worlds without peering. We will create a network interface in the New Office VNet that points to the Main Office's service.
- In the Azure portal search bar, type "Private Endpoints" and click Create.
- Basics Tab:
- Select the Resource Group and Region of your New Office VNet.
- Give it a name, like
pe-to-main-office.
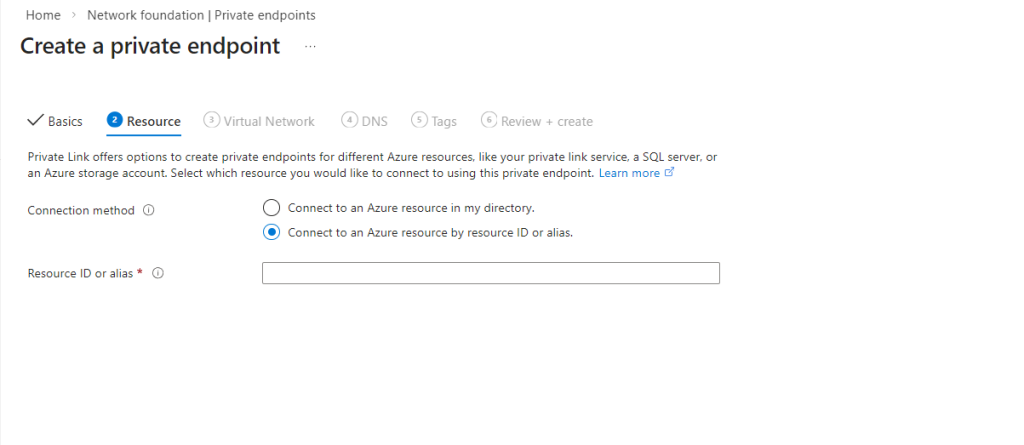
- Resource Tab (The critical part):
- Connection Method: Select "Connect to an Azure resource by resource ID or alias".
- Resource Alias: Paste the long Alias string you copied in Step 2.
- Virtual Network Tab:
- Virtual Network: Select your New Office VNet (
10.0.0.0/16). - Subnet: Select the
client-subnetwhere your Client VM lives.
- Virtual Network: Select your New Office VNet (
- DNS Tab: For this specific overlap scenario, it's often easier to manage DNS manually or use hosts files initially. You can leave the default "Yes" for integration, but we will rely on the IP address for testing.
- Review and Create.
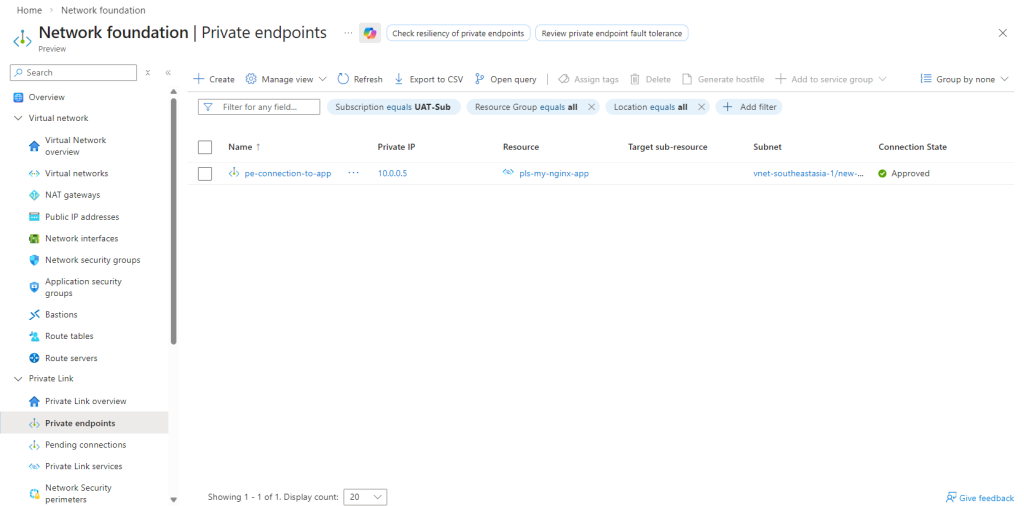
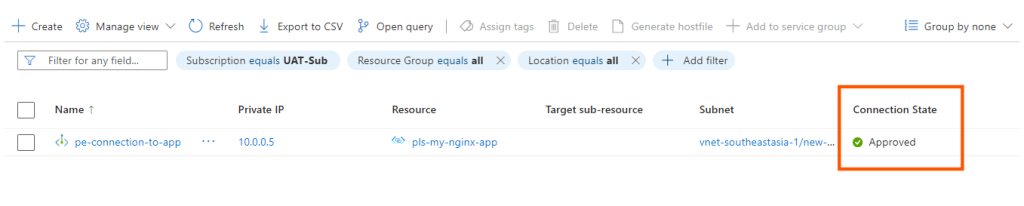
Step 5: Approve the Connection
Because we chose "Anyone with your alias" earlier, the connection state is initially "Pending."
- Go back to the Main Office side.
- Navigate to your Private Link Service resource (
pls-main-office-nginx). - On the left menu, click Private endpoint connections.
- You will see a connection request from the New Office. Select it and click Approve. The status will change to "Approved."
Step 6: Testing the Connectivity
This is the moment of truth.
- Go back to the New Office side and find your Private Endpoint (
pe-to-main-office). - In the Overview or DNS configuration section, find the Private IP address assigned to this endpoint. Let's say Azure assigned it
10.0.1.4(an IP from the New Office subnet). - Log in to your Client VM in the New Office.
- Open a browser or use curl/PowerShell.
- Test 1 (The Failure): Try to connect to the original Main Office ILB IP:
curl http://10.0.1.100.- Result: This will time out. Your local router thinks
10.0.1.100is in your local network and tries to find it locally. It fails.
- Result: This will time out. Your local router thinks
- Test 2 (The Success): Try to connect to the Private Endpoint IP:
curl http://10.0.0.5.- Result: You should see the default Nginx welcome page!
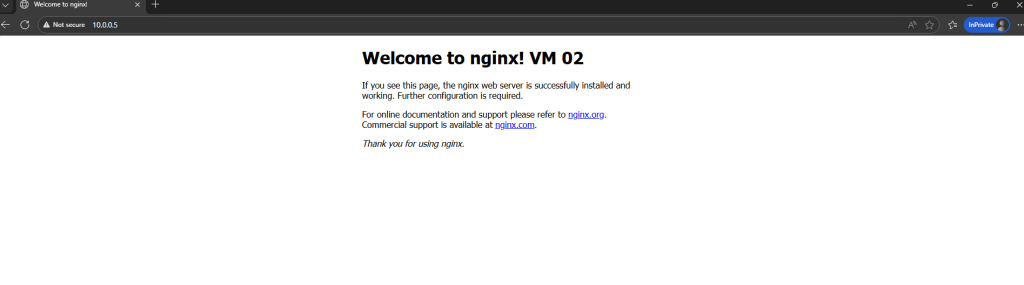
You have successfully connected two VNets with overlapping IP ranges.
Why Does This Work? (The Deep Dive Simplified)
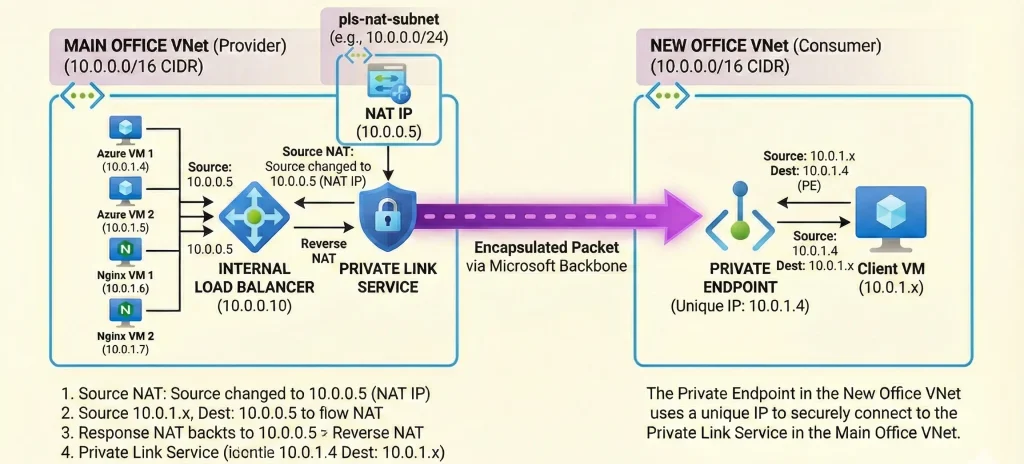
How did Azure bypass the IP conflict? It uses Network Address Translation (NAT).
When your Client VM (10.0.1.x in New Office) sends a request to the Private Endpoint (10.0.1.4), Azure encapsulates that packet and sends it through the Microsoft backbone network to the Private Link Service in the Main Office.
Before the packet reaches the Main Office Internal Load Balancer, the Private Link Service performs Source NAT. It changes the source IP address of the packet from the Client VM's IP to an IP address from the pls-nat-subnet we created (e.g., 10.0.0.5).
Your Nginx backend VMs don't see the conflicting "New Office" IP. They only see a local request coming from 10.0.0.5. They reply to that local IP, and the Private Link Service translates it back and sends it through the tunnel to the client.
This clever translation avoids the routing confusion entirely.
Frequently Asked Questions (FAQ)
Q: Does this work across different Azure Subscriptions or Tenants?
A: Yes, absolutely. As long as you have the Alias, you can connect from any subscription or tenant (company). This is the standard pattern for B2B (Business-to-Business) connectivity in Azure.
Q: Does this require a Standard Load Balancer?
A: Yes. The Private Link Service only supports Standard SKU Load Balancers. It does not work with Basic Load Balancers.(Basic Load balancers already deprecated)
Q: Is the traffic going over the public internet?
A: No. All traffic between the Private Endpoint and the Private Link Service travels entirely within the secure Microsoft Azure backbone network.
Q: What if I need to see the original client's IP address on my Nginx server for logging?
A: By default, you won't see it due to NAT. To see the original IP, you must enable "TCP Proxy v2" on the Private Link Service configuration and configure your Nginx server to accept and decode the Proxy Protocol header.
Q: Does this cost extra money?
A: Yes. You pay for the Private Link Service (hourly rate), the Private Endpoint (hourly rate), and for the data processed (per GB) flowing through the connection. It is generally more expensive than VNet peering but solves problems peering cannot. Using Azure Pricing Calculator You can get cost idea before the deployment.
Q: How can I mitigate these kinds of issues in the future?
A: You can significantly reduce these kinds of architectural and cost-related issues by implementing a well-designed Azure Landing Zone. Azure Landing Zone provides a structured foundation with proper network topology, subscription design, governance (Policies), security controls, and connectivity models (Hub-Spoke, Private DNS, etc.) from the beginning.

No comments yet. Be the first to share your thoughts!