
You know that feeling when you want to build something amazing online? I've been there. Setting up WordPress on Ubuntu server might sound scary at first, but trust me - it's like putting together LEGO blocks once you know the steps. Today, I'm going to walk you through this journey, and by the end, you'll have your WordPress site running smoothly on Ubuntu.
Why Ubuntu and WordPress Make the Perfect Match
Before we jump into the technical stuff, let me tell you why this combination is so popular. Ubuntu is like that reliable friend who never lets you down - it's stable, secure, and completely free. WordPress? Well, it powers over 40% of the internet. When you bring these two together, magic happens.
I remember my first time setting up WordPress on Ubuntu. I was nervous, made some mistakes, but learned so much. Now, after helping dozens of people do the same, I can tell you - it's actually quite straightforward when you follow the right steps.
Which Ubuntu Version Should You Pick?
Here's something important - not all Ubuntu versions are created equal for WordPress hosting. You're probably wondering which one to choose, right?
Ubuntu 24.04 LTS is your best bet right now. Why? Because LTS means Long Term Support - you get updates for 5 years! It's like buying a car with an extended warranty. Ubuntu 20.04 LTS works great too if you're already using it.
| Feature | Long-Term Support (LTS) | Non-LTS (Interim) |
| Release Cycle | Every two years in April (e.g., 22.04, 24.04). | Every six months, in between LTS releases (e.g., 23.04, 23.10). |
| Support Lifespan | 5 years of standard support, with an additional 5 years of Extended Security Maintenance (ESM) available through Ubuntu Pro. | 9 months of support. |
| Ideal User | Users who need a stable, reliable system with long-term support, such as businesses, servers, and developers who prefer not to upgrade frequently. | Users who want the latest features, updated software, and newest kernel support and are comfortable with more frequent upgrades. |
| Stability | Highly stable and well-tested. New features are introduced more cautiously. | Less focus on long-term stability and more on introducing new features and software. Can be considered a testing ground for the next LTS. |
What You'll Need Before Starting
Let's talk about the minimum requirements for hosting WordPress on Ubuntu. Think of these as the basic ingredients for your recipe:
- RAM: At least 1GB (but 2GB makes everything smoother)
- Storage: 10GB minimum (20GB gives you breathing room)
- Processor: 1GHz or faster
- Internet: A stable connection (obviously!)
You know what's funny? These requirements are so modest that even an old laptop gathering dust in your closet could probably handle it.
Choosing Your Stack: LAMP vs LEMP
Now comes the big decision - LAMP or LEMP stack? Don't worry, I'll make this simple.
StackWhat It MeansBest ForLAMPLinux, Apache, MySQL, PHPBeginners, most tutorials use thisLEMPLinux, Nginx, MySQL, PHPBetter performance, uses less memory
Most people start with LAMP because Apache is more beginner-friendly. But if you're feeling adventurous, Nginx (the 'E' in LEMP) can handle more traffic with less resources. It's like choosing between a comfortable SUV and a sporty sedan - both will get you there.
Step-by-Step Installation Guide
- Ubuntu Server (20.04 or later recommended)
- Root/Sudo access for the Server.
- Domain name pointing to your server's IP. (Before the Installation must needed Point the DNS A records to Server IP)
- LAMP stack (Linux, Apache, MySQL/MariaDB, PHP)
- Web server: Nginx or Apache with mod-rewrite module.
- Disk space: At least 1 GB.
- PHP: Version 8.0 or higher.
- Database: MySQL 5.015 or higher (An alternative is MariaDB, version 10.1 or higher)
- RAM (Random Access Memory): At least 512 MB.
- CPU (Central Processing Unit): At least 1.0 GHz.
Step 1: Spin up Ubuntu Server On Digital Ocean (Install Ubuntu 22.04Lts)

Choose right Region and Datacenter


For the high security Use SSH-Key for the server access. In this demo I'm Using Password base method.


Logging to the server :

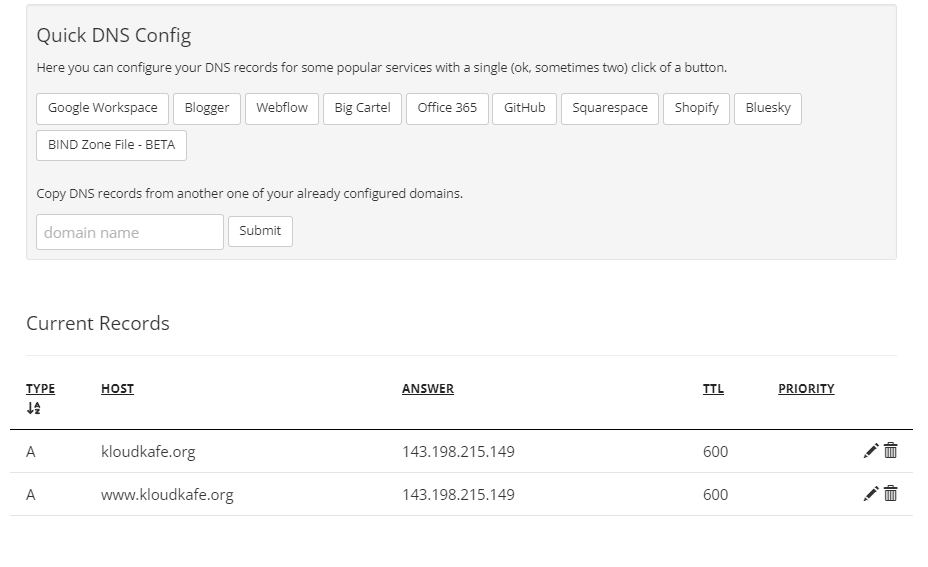
Step 2: DNS Point
Logging to the DNS Provider and Point A records to the Server.
Step 3: Install Apache, MySQL, PHP (LAMP Stack)
sudo apt update

sudo apt install apache2 mysql-server php php-mysql libapache2-mod-php php-cli php-curl php-gd php-mbstring php-xml php-xmlrpc php-soap php-intl php-zip unzip -y


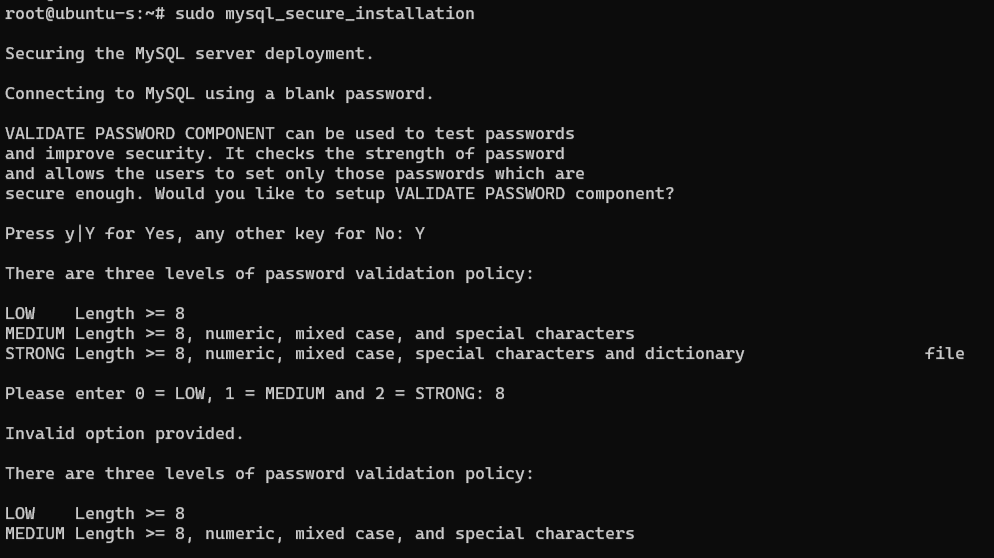
Step 4: Secure MySQL & Create Database
sudo mysql_secure_installation
Connecting to MySQL using a blank password. : Y
There are three levels of password validation policy: 8 (Strong)
There are three levels of password validation policy: 2 (Strong)
Remove anonymous users? (Press y|Y for Yes, any other key for No) : Y
Disallow root login remotely? (Press y|Y for Yes, any other key for No) : Y
Remove test database and access to it? (Press y|Y for Yes, any other key for No) : Y
Reload privilege tables now? (Press y|Y for Yes, any other key for No) : Y

Then log into MySQL:
sudo mysql

Create a database and user for WordPress:
CREATE DATABASE wordpress_db;
CREATE USER 'wp_user'@'localhost' IDENTIFIED BY 'StrongPassword123!';
GRANT ALL PRIVILEGES ON wordpress_db.* TO 'wp_user'@'localhost';
FLUSH PRIVILEGES;
EXIT;
Note : Change 'StrongPassword123!' to your Custom Password like "Niwantha@Passwd2025"
Please note down that password somewhere because after the all Installation and first WordPress login we have to give this password.
This Step we are going to create Database , User , Password and grant the all privileges for the wp_user .

Step 5: Download and Configure WordPress
Now MySQL Installation configurations has done. Now we need to install WordPress on our server.
cd /tmp
curl -O https://wordpress.org/latest.tar.gz
tar -xvzf latest.tar.gz
sudo mv wordpress /var/www/html/
sudo chown -R www-data:www-data /var/www/html/wordpress
sudo chmod -R 755 /var/www/html/wordpress
If you're logging with root user , then no need use Sudo.
Step 6: Configure Apache for WordPress
Create a virtual host:
Note : This may add new site-available directory file on Apache server. add your domain name to this config file.
sudo nano /etc/apache2/sites-available/yourdomain.com.conf

Paste the following (change your domain name and admin email):
<VirtualHost *:80>
    ServerAdmin admin@yourdomain.com
    ServerName yourdomain.com
    ServerAlias www.yourdomain.com
    DocumentRoot /var/www/html/wordpress

    <Directory /var/www/html/wordpress>
        Options Indexes FollowSymLinks
        AllowOverride All
        Require all granted
    </Directory>

    ErrorLog ${APACHE_LOG_DIR}/error.log
    CustomLog ${APACHE_LOG_DIR}/access.log combined
</VirtualHost>
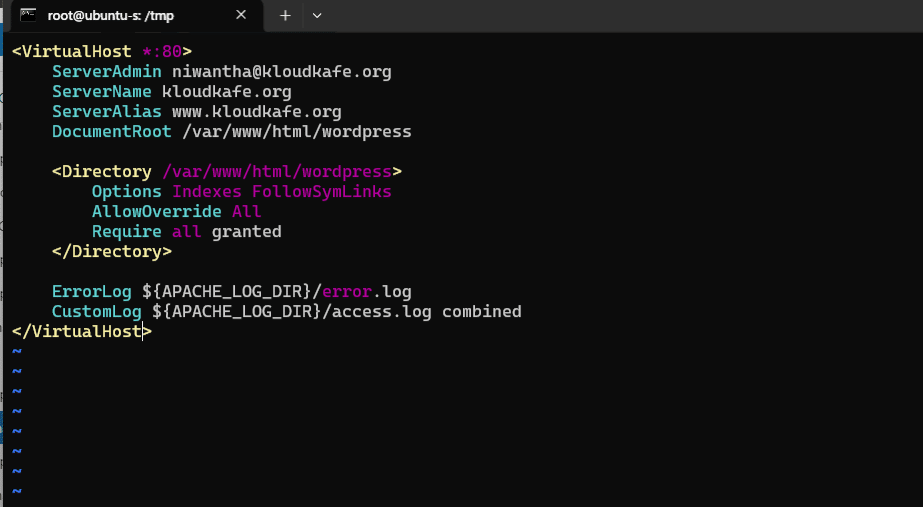
Save and Exit
Enable the site and required modules 9 (Change your Domain)
sudo a2ensite yourdomain.com.conf
sudo a2enmod rewrite
sudo systemctl restart apache2

Step 7: Enable SSL with Let's Encrypt
What is Let’s Encrypt?
Let’s Encrypt is a free service that gives SSL certificates for websites. SSL makes your website secure by using HTTPS instead of HTTP. SSL helps to protect user data and builds trust with your visitors.
Why Use Let’s Encrypt?
- Free SSL Certificates: You don’t have to pay to make your website secure.
- Trusted by Browsers: Let’s Encrypt is trusted by all major web browsers.
- Easy to Install: Many hosting providers support one-click installation.
- Improves SEO: Google gives better ranking to HTTPS websites.
- Automatic Renewal: Certificates can be set to renew on their own, so your site stays secure.
Install Certbot:
apt install certbot python3-certbot-apache -y

Run Certbot (Change Domain name):
certbot --apache -d yourdomain.com -d www.yourdomain.com


Test auto-renewal:
sudo certbot renew --dry-run
Step 8: Complete WordPress Installation
Go to your browser and visit:
https://yourdomain.comAlmost Done! Now we need to check our website. In this scenario I’ve used my own domain Koudkafe.org . lets logging and check how is it work
All good. Website loading with Https.

Step 9 : Installation of WordPress
Select Language and click continue.

Fill the Database Name , Username , Password .
Note : For the password, use the one we set during the installation of the MySQL WordPress database.


Now we need to provide the name, password, and other necessary details for our website.


Almost Done!!!

Performance Optimization Tips
Nobody likes a slow website. Here are my favorite performance optimization methods:
Caching is your best friend. It's like preparing meals in advance - your server doesn't have to cook everything from scratch each time someone visits.
Consider using:
- Redis or Memcached for object caching
- WP Super Cache or W3 Total Cache plugins
- CDN services for static files
Also, don't forget about WordPress cron jobs on Ubuntu. They handle scheduled tasks like publishing posts and checking for updates.
Keeping WordPress Updated Safely
Updating WordPress on Ubuntu doesn't have to be scary. Always:
- Backup first (seriously, always)
- Test updates on a staging site if possible
- Update plugins and themes one at a time
- Keep an eye on error logs
Advanced Setup: WordPress Multisite
Feeling ambitious? WordPress multisite setup on Ubuntu lets you run multiple websites from one WordPress installation. It's like being a landlord for websites - one building, many tenants.
Troubleshooting Common Issues
When things go wrong (and sometimes they will), don't panic. Most WordPress Ubuntu server problems have simple solutions:
- White screen of death? Check PHP memory limits
- Can't upload files? Look at file permissions
- Database connection errors? Verify your credentials
I've seen it all, and trust me - every problem has a solution.
Conclusion
There you have it! Installing WordPress on Ubuntu server isn't rocket science - it just needs patience and the right guidance. Whether you choose LAMP or LEMP, Docker or traditional installation, the key is starting somewhere.
Remember, every expert was once a beginner. I made plenty of mistakes when I started, and you might too. That's okay! The WordPress and Ubuntu communities are incredibly helpful.
Ready to build something amazing? Your WordPress site on Ubuntu is waiting. Start with a fresh Ubuntu installation, follow these steps, and before you know it, you'll be publishing content to the world.
Got questions? Hit me up in the comments. I love helping people get their WordPress sites running on Ubuntu. After all, we're all in this together, building the internet one website at a time.


No comments yet. Be the first to share your thoughts!