
In Microsoft 365, sensitivity labels are used to classify and protect sensitive information across various applications such as Word, Excel, PowerPoint, and Outlook. These labels help to ensure that data is handled appropriately based on its sensitivity level and helps organizations meet regulatory compliance and data security standards.
This guide will walk you through the process of creating and publishing a sensitivity label in Microsoft 365.
Prerequisites
Before creating sensitivity labels, ensure that you have the necessary permissions:
- Microsoft 365 compliance center or Microsoft Purview admin role.
- Microsoft Information Protection (MIP) solution should be enabled in your organization.
Step 1: Access Microsoft Purview Compliance Center
- Login to Microsoft 365 Admin Center:
- Go to Microsoft 365 Admin Center.
- Sign in with your admin credentials.
- Navigate to Microsoft Purview Compliance Center:
- On the left-hand menu, select Compliance to open the Microsoft Purview Compliance Center.
- Alternatively, you can go directly to Microsoft Purview Compliance Center.
Step 2: Create a Sensitivity Label
- Go to Information Protection:
- In the Microsoft Purview Compliance Center, click on Solutions in the left sidebar.
- Under Solutions, select Information Protection.
- Start Creating a Label:
- In the Information Protection pane, select Labels.
- Click on + Create a label at the top of the page.
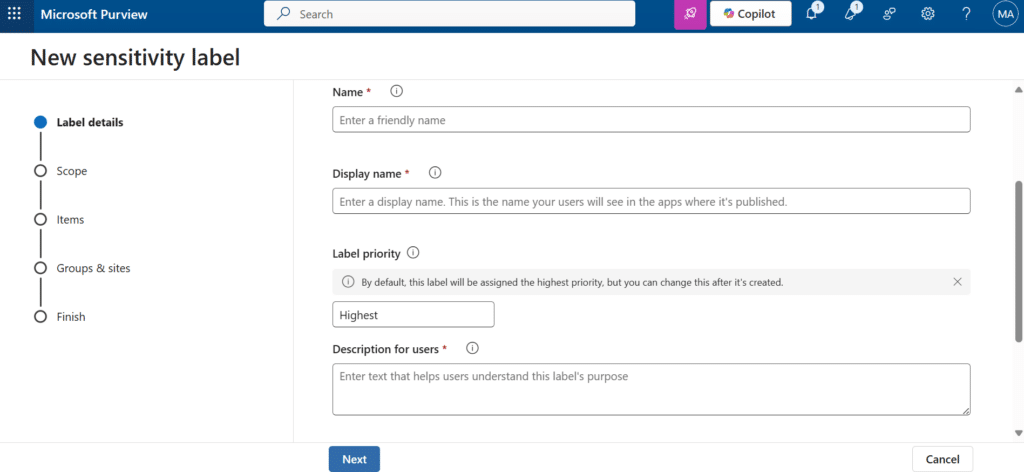
3. Configure the Label Settings:
- Name the Label: Provide a clear, descriptive name for the label (e.g., “Confidential”, “Highly Confidential”, etc.).
- Description: Add a description for the label. This helps users understand the purpose of the label. For example, “This label should be applied to documents containing confidential financial information.”
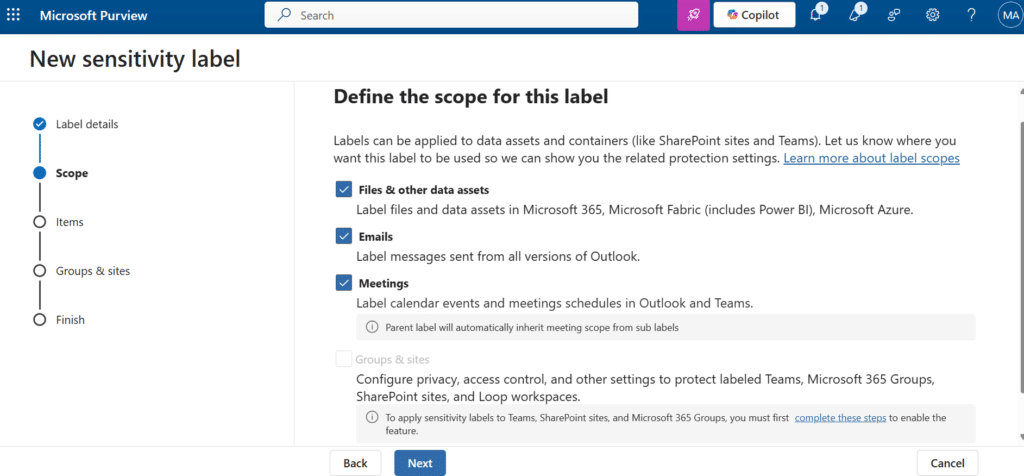
- Define the scope: Choose what the sensitivity label will protect by selecting one or more of the following options.
- Files & other data assets
Label files and data assets in Microsoft 365, Microsoft Fabric (includes Power BI), Microsoft Azure. - Emails
Label messages sent from all versions of Outlook. - Meetings
Apply the label to Microsoft Teams meetings to protect meeting invites, chats, and shared content. - Group & sites
Apply the label to Microsoft 365 Groups, SharePoint sites, and Teams to control access, sharing, and privacy settings.
- Files & other data assets
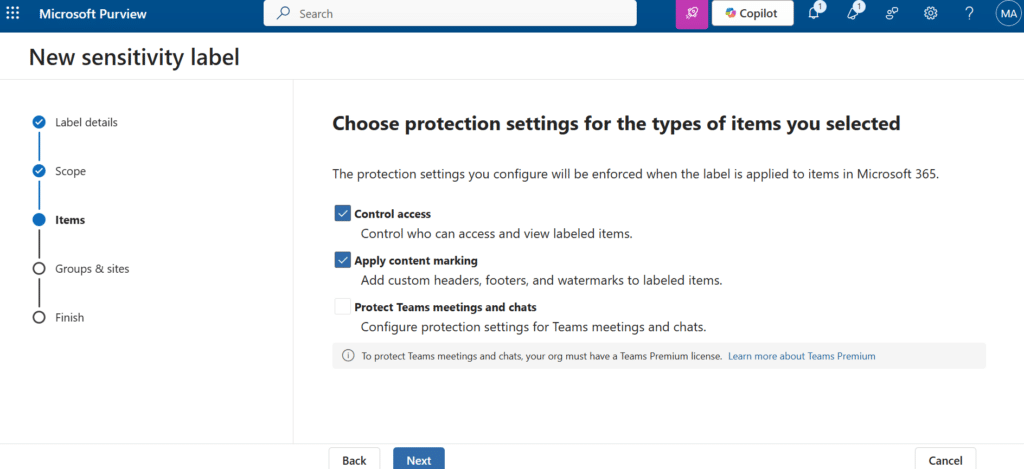
4. Choose Protection Settings:
- Encrypt content: You can choose to encrypt the document to ensure that it can only be accessed by authorized users.
- Mark the content: Choose whether the label will add visual markings like headers, footers, or watermarks to the document.
- Protect Teams meetings and chats: Configure protection settings for Teams meetings and chats.
Note: Some of these options will only be available depending on your Microsoft 365 subscription plan.
Step 3: Configure Label Policies
Once the sensitivity label is created, you will need to define how it will be applied within your organization:
- Go to Label Policies:
- After saving the label, click on Label policies in the Information Protection section.
- Click + Create a policy to define the label policy.
- Create a New Label Policy:
- Choose labels to include: Select the created sensitivity label/s to include to the policy creating. The policy settings will be applied to the selected label/s.

- Define user or group access: Choose which users or groups this policy will apply to. You can choose All users or specific departments or teams.

- Apply settings: Decide whether the labels will be applied automatically based on conditions or manually by users.

- Name the policy: Name the policy created and give a description about the policy.
- Review and Finalize the Policy: Once you have set up the policy, review all settings to ensure that they align with your organization’s requirements. You can also test the policy on a small set of users before deploying it organization-wide.
- Publish the policy: After confirming the settings, click Publish to apply the sensitivity label policy to your selected users and groups.
Step 4: Verify the Sensitivity Label is Applied
- Check User Application:
- After the policy has been published, users in the selected group will be able to apply the sensitivity label to documents and emails.
- Test by creating a new document in Word or Excel, and check the Sensitivity option in the toolbar to see the newly created label.
- Ensure Label Settings Work:
- Verify that the encryption, restrictions, or visual markings defined for the label are applied correctly when the label is used.
Step 5: Monitor Label Usage
- View Reports:
- You can monitor the usage of sensitivity labels by going to the Microsoft Purview Compliance Center.
- Under Information Protection, go to Activity explorer to track how labels are being applied across your organization.
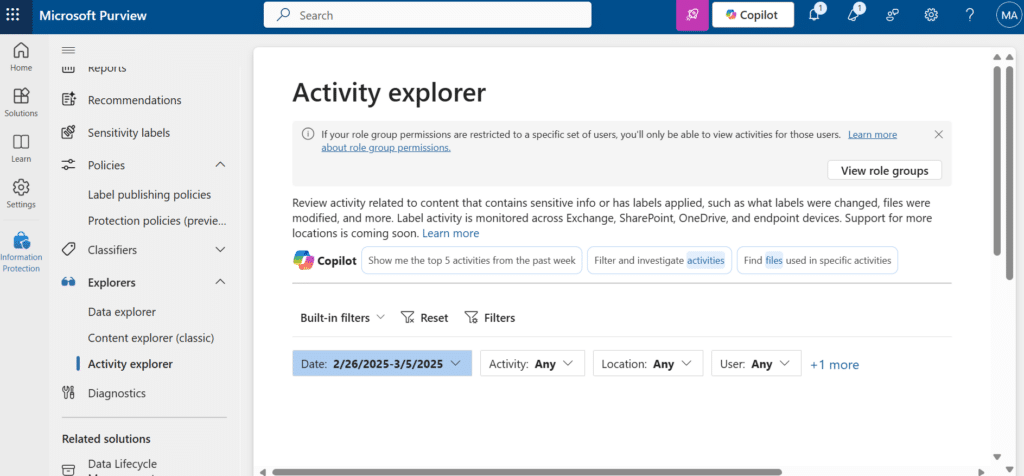
- Adjust Policies if Necessary:
- Based on the reports, you can make adjustments to your label policies to refine which content is labeled and how it is protected.


No comments yet. Be the first to share your thoughts!